An error boundary is a React component that catches JavaScript errors that occur anywhere in the child component tree below it, and prevents the program from crashing by showing a fallback user interface. It enables programmers to contain failures and stop them from spreading throughout the entire application. Error boundaries can catch rendering errors, errors in lifecycle methods and errors in constructors of the entire tree below them.
What Is an Error Boundary in React?
An error boundary is a React-specific feature that wraps a component and prevents any errors from spreading to other parts of the application and crashing it.
Here’s what you need to know.
Understanding Error Boundary in React
Error boundary is a React-specific component that wraps around a component tree and prevents any errors within that component from spreading and causing an entire application to crash.
To use it, you must simply wrap the component tree you want to protect with an error boundary component. The error border will detect errors and show the fallback UI when they happen within the wrapped component tree. Class components with either (or both) of the following lifecycle methods are defined as error boundaries:
static getDerivedStateFromError(): This method is used to render a fallback UI after an error has been thrown.componentDidCatch(): This method is used to log error information.
Error boundaries are an effective tool for enhancing your React application’s dependability and stability. You can improve user experience and prevent errors from crashing your entire program by using error boundaries.
How to Implement an Error Boundary in React
To implement an error boundary in React, you can follow these steps:
- Create a class component that extends React.Component.
- Implement either one or both of the following lifecycle methods:
static getDerivedStateFromError()(used to render a fallback UI after an error has been thrown) orcomponentDidCatch()(used to log error information). - Wrap the component tree that you want to protect in the error boundary component.
Error Boundary in React Example
Creating the Error Boundary Component
Here is a simple example of an error boundary component:

To use an error boundary, just include the component tree you wish to protect in the ErrorBoundary component, as shown below:

Using the Error Boundary Component
Now let’s use the ErrorBoundary component.
The example code below uses the ErrorBoundary component to enclose the MyComponent component at the bottom of the program.
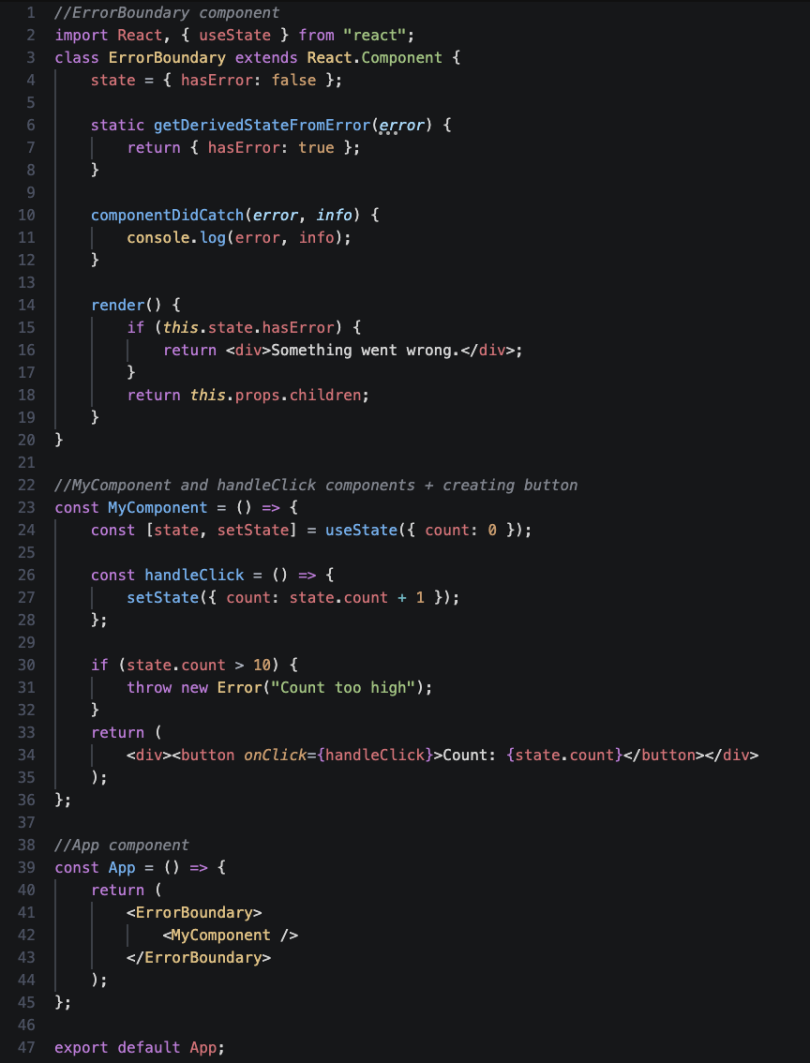
In the MyComponent component, a state variable called count is initialized with a default value of zero. It also includes a button that, upon each click, increments the count state by one. The JSX code at the bottom comprises MyComponent, enclosed by an ErrorBoundary component.
More than 10 clicks on the button will result in an error being thrown by the MyComponent component. The problem will be detected by the ErrorBoundary component, which will then show the "Something went wrong" message in the fallback user interface.
ErrorBoundary stops the issue from crashing the application completely, serving as a layer of security and allowing a user to still utilize the application even if the MyComponent component fails.
Error boundaries can also be used to record error data. Your error border component’s componentDidCatch() lifecycle method can be used to accomplish this. The error object and the error info object are the two arguments given to the componentDidCatch() function. The component where the problem occurred is described in the error info object.
When to Use Error Boundaries
You should use error boundaries in any React application to keep mistakes from crashing the whole application and to improve user experience. In React, error boundaries are helpful for detecting and addressing issues that happen in component constructors, lifecycle methods and rendering.
You can use the error boundaries in various situations, including:
- Preventing an error in one component from causing the entire application to crash. Instead, error boundaries provide you the option to gracefully manage the issue and show a fallback user interface.
- Providing a smoother user experience when an error occurs. Error boundaries present a helpful message or a fallback user interface (UI) rather than a blank screen or an error message that might be perplexing to the user.
- Restricting faults to particular areas of your program. This means that the functionality of other components or the entire application will not be impacted by a bug in one component.
- Logging problems, which can be helpful for debugging and troubleshooting. You can store error data locally for analysis or send it to a server for monitoring.
- When working with code that might come into contact with unexpected events or data. This can include network requests, external libraries or user-generated material, where error borders are especially helpful.
- During development to recognize and handle mistakes in a controlled manner. Using error boundaries can make it simpler to track, debug and fix problems during code development.
You might also, for instance, have a component that retrieves information from an API. If the API call fails, you can use an error boundary to show the user a message that reads, "Unable to fetch data."
Though useful for many instances, it’s important to use error boundaries appropriately. They aren’t intended to control how your program is supposed to behave or handle unexpected problems. They also miss mistakes in asynchronous code, such as setTimeout() or Promise callbacks, as well as in event handlers.
Limitations of Using Error Boundary in React
Error boundaries are a potent tool for enhancing the dependability and stability of React applications, but they do have significant drawbacks. The following are some restrictions on React’s use of error boundaries:
- Error boundaries can’t catch all errors. They’re unable to detect mistakes in event handlers, asynchronous programming or server-side rendering, for instance.
- Error boundaries can add overhead to your application. This is necessary so that they can monitor the component tree’s current condition and identify faults.
- Error boundaries can make it difficult to debug errors. This is due to the fact that they can hide the initial mistake and make it challenging to identify the problem’s underlying cause.
- Only problems that happen during rendering, in lifecycle methods, or in the constructors of the entire tree below them can be caught by error boundaries. Event handler faults or problems in asynchronous code, such as
setTimeout()or Promise callbacks, won't be caught by them. - It doesn’t replace good coding principles. While it catches unexpected errors, your components should still have strong error handling and validation processes.
- Error boundaries can’t catch errors that occur in event handlers such as
onClickand onChange. In some circumstances,try…catchblocks or other error handling strategies will be required. - The
componentDidCatchlifecycle action and class components are used to implement error bounds. They can’t be directly used with functional components. However, you may achieve a similar feature with functional components by using theuseErrorBoundaryhook from third-party libraries.
If an error occurs within an error boundary itself, for example, in the componentDidCatch() method, React will not be able to recover from that, and it will result in a double crash.
Error Boundary vs. Try…Catch
Try...catch and error boundaries are two methods used in JavaScript to deal with errors. They do, however, each have unique advantages and disadvantages.
Error boundaries is a React specific feature that enables you to catch problems anywhere in the component tree beneath them. Since it is declarative, all you need to do to secure a component tree is simply wrap it with an error border component.
Try…catch is a general JavaScript feature that enables you to detect mistakes in a particular piece of code. It’s mandatory, so you must explicitly enclose the code you want to safeguard in a try...catch block.
When Should You Use an Error Boundary?
- To protect critical components from crashing the entire application.
- To handle errors in asynchronous operations, such as network requests.
- To log error information to help you identify and fix errors in your code.
Here is an example of how to use an error boundary:


As we saw previously, this example uses an ErrorBoundary component to enclose the MyComponent component. After more than 10 clicks on the button, MyComponent will throw an error. Error boundary stops the issue from crashing the application completely.
When Should You Use Try...Catch?
- To handle errors in specific blocks of code.
- To handle errors in event handlers.
- To handle errors in server-side rendering.
Below is an example of try…catch in JavaScript. The fetchData() function will throw an exception if the API call is unsuccessful. The error will be caught by the try...catch block, allowing you to respond accordingly.

Frequently Asked Questions
What is error boundary in React?
An error boundary is a React component that catches JavaScript errors that are in its child component tree, and logs the errors and displays a fallback UI instead of the crashed component tree. Error boundaries can catch errors during rendering, in lifecycle methods and in constructors of the entire tree below them. Error boundaries are often used for debugging or to prevent one component from crashing all of an application.
What is an example of a boundary error?
An example of an error boundary component in React (as referenced from the React documentation) is:
class ErrorBoundary extends React.Component {
   this.state = { hasError: false };
 }


 static getDerivedStateFromError(error) {
   return { hasError: true };
 }


 componentDidCatch(error, info) {
   console.log(error, info);
 }


 render() {
   if (this.state.hasError) {
     return <div>Something went wrong.</div>;
   }


   return this.props.children;
 }
}
Why do we need error boundaries in React?
Error boundary is a React-specific feature that allows you to wrap a component tree and helps you catch any problems that occur. This can increase the dependability and stability of React apps and improve user experience by preventing mistakes from crashing the entire program.
What is the difference between error boundary and try…catch?
Try...catch and error boundary are two methods used in JavaScript to deal with errors.
Try…catchis a mandatory JavaScript feature used to detect mistakes. You must explicitly enclose the code you want to safeguard in atry…catchblock.- Error boundary is a declarative feature specific to React that allows you to wrap a component tree.