When you’re learning any new skill, the hardest part is figuring out how to get started and how to set yourself up for success. That’s true for learning Python, too! You need to figure out how to get the language, what development environment to use, how to ensure you have access to the most advanced tools . . . the list goes on. Just getting started can be overwhelming, especially when you’re new and don’t yet have much of an understanding of what you need (or why).
Here’s the good news: You can solve all of these problems using the Anaconda distribution of Python.
What Is the Anaconda Distribution of Python?
Before we discuss Anaconda in detail, let’s talk about what you need to set yourself up for success.
What Tools Does Anaconda Provide?
Anaconda provides the following tools through a single, simple download, which makes it extremely convenient. They’re also some of the main tools you need to get started programming in Python.
- The most up-to-date version of the Python programming language (I bet that’s not a surprise).
- An integrated development environment (IDE).
- Access to a user-friendly package manager so you can leverage other people’s Python based tools such as Pandas and TensorFlow.
Installing Anaconda will, by default, install the most up-to-date version of Python so you’re ready to go there. Anaconda will also automatically install many of the key Python packages available for machine learning and data science such as NumPy, SciPy, and Matplotlib. This means that once you have Anaconda installed you only need to decide which integrated development environment (IDE) you want to use.
And since people always appreciate getting things for free, I’ll also point out that Anaconda is free for individual use.
What IDEs Come With Anaconda?
Anaconda comes with several IDEs already installed and each provides different features. People have different preferences, but I find most people use either Jupyter Notebook or Spyder.
Note: Jupyter Lab is slowly replacing Jupyter Notebook, but if you learn Jupyter Notebook you’ll both have the currently expected industry skills and a good head start on learning Jupyter Lab in the future.
What Is Jupyter Notebook in Anaconda?
Jupyter Notebook is probably the favored IDE for Python-based data scientists due to its modular nature (which makes it feel almost like writing in a notebook) and its ability to store plots within the notebook itself. These features make Jupyter Notebook an excellent tool for data exploration and for communicating your results.
Jupyter Notebook Example
The following image shows example code from a Jupyter Notebook I made creating a Matplotlib plotting tutorial.

This image shows two input cells and one output cell. You can identify the input cells from the gray background and the blue text that says In [x] next to them, where x is the number of the input cell. The output cell shows your specified outputs with a white background.
The first input cell includes several import statements, reading in the packages (more on those in a moment!) that I used later in the data analysis tutorial. There is no output cell following that input cell because I didn’t specify any outputs.
The second input cell reads in the data set I used in the example then displays the data frame in an output cell. The data is shown in the table below the input, and enables the student following the tutorial to explore the data before following the rest of the tutorial.
Jupyter Notebook Advantages
Running Code One Step at a Time
The ability to proceed through your code one step at a time and share show results as you go makes Jupyter Notebook a superior conversation and tutorial tool. You can easily show your work because each input cell may have only one or two lines of code, which you’ll use to generate the next output. This makes Jupyter Notebook a great tool for showing people why you’re making specific decisions and drawing particular conclusions.
Effective Tutorial Tool
Jupyter Notebook is also an excellent tutorial tool because you can walk a student through the code one step at a time and output the results as you go, which makes it easier for them to learn the skills you’re trying to demonstrate with the Notebook.
Creating a Matplotlib Object in Jupyter Notebook
To highlight Jupyter Notebook’s tutorial capabilities, here are a few images from my tutorial showcasing how to generate a subplot in Matplotlib.
Creating Plot Rows
First, I show the reader how to create a Matplotlib subplot object with four rows of plots, of a specified size. I add code to an input cell to do so, enabling the reader to see the required input, then I run the cell to show them the resulting plot. This shows the reader how to create an empty plot to which they can add details.

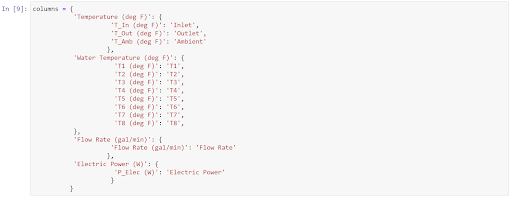
Creating a Dictionary to Define Included Data
Next I show them how to create a dictionary defining the columns of the data set to be included in each subplot. This dictionary provides both the columns in the data set and the labels to be used when creating the legend for the plots. I create the dictionary in a new cell with no output, enabling the student to absorb the creation of the dictionary without getting overwhelmed by other details or additional code. Note that this cell has no output, it only saves the dictionary for later use.
Referencing the Dictionary and Adding Data to Subplot
Then I show readers how to reference that dictionary to add data to the subplot. I added a new input cell that:
- creates the subplot array
- iterates through each of the defined plots (e.g.
Temperature (deg F)orWater Temperature (deg F)) in the columns dictionary - iterates through each data series in the individual plot (e.g.
T_In (deg F)orT_Out (deg F)) to plot the data series on the specified plot - saves the plot to a .
pngfile
Printing Plot Results
Since the plot is printed right after we create it, readers can see the result of this code right away and understand why the code does what it does.
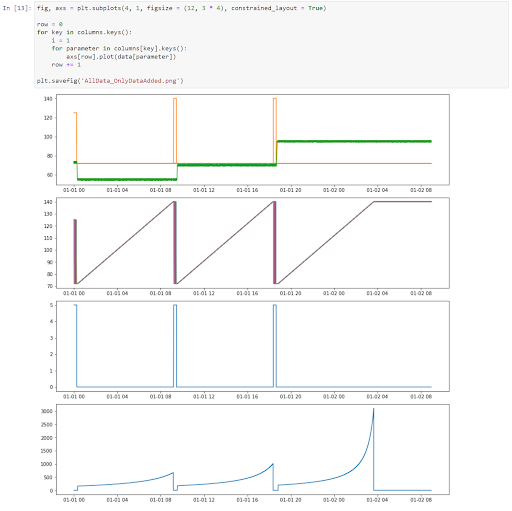
This approach lets you progress through the tutorial one step at a time, adding a small action each time, so the reader can easily pick up the new skill.
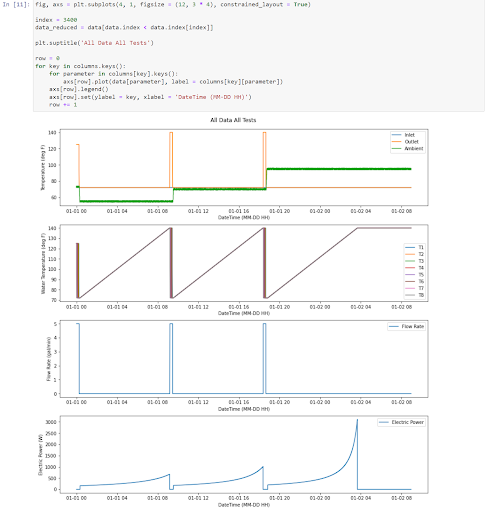
Adding Plot Titles, Labels and Legends
For instance, notice that the above plots don’t contain any titles, axis labels, or legends. The next step I take is to demonstrate the following code which added those elements to the plot.
What Is Spyder in Anaconda?
Spyder is an IDE included with Anaconda and is an acronym for Scientific PYthon Development EnviRonment. This is a useful tool for Python development because it has strong debugging tools. With Spyder, you also have the benefit of easy visualization; you can see everything at once.
Here’s a Spyder environment window I used when I created a tutorial on the basics of using Scikit-learn to implement machine learning. This single screenshot shows you all of the things that I really like about Spyder. Take a look, and I’ll walk you through the details.

Spyder Features
Script Editor
The large box on the left side of the image is the script editor window, as highlighted in the following image.
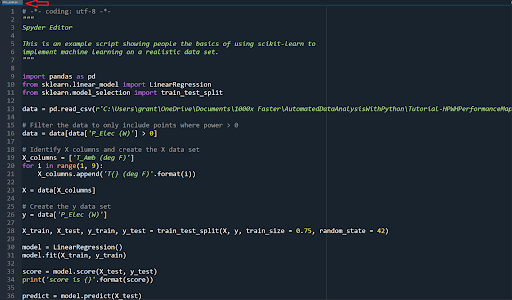
If you look at the tab in the upper left (follow the red arrow) you’ll see that I’m editing a Python file called intro_script.py. This window is helpful as it provides a single place where you can write scripts. Everything else supports that goal.
IPython Console
The window in the bottom right (blown up below) is also extremely valuable.
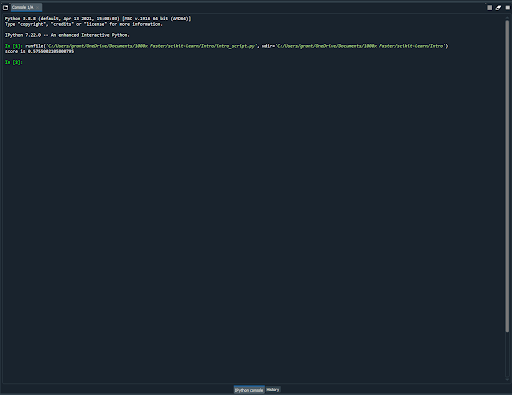
You can see in the bottom left corner of that window (which is pretty close to the bottom middle of the image) it says that it’s an IPython Console. This console gives you the ability to instantly run any Python command you like, and provides a terminal to output updates or debugging information that may be useful for you.
If you look at the content in there you can see just after the In [1]: that I ran my example script (the green text). Below that, the script printed an output displaying a score which states how well the model I developed in that script performed (not well, womp womp).
With the IPython console, you can instantly test a piece of code before putting it in your script. Say you have a script half written and you aren’t sure how to write the next line. You’re trying out new commands based on advice from the internet, and you aren’t confident you know how to do it right. Here’s what you do: Run your script to create the same conditions that your new line will experience, then write that new line in the IPython Console.
Since you can execute that line instantly, you can test to make sure your code is correct (and fix it when it doesn’t do what you expected). Once it’s working how you want, you can add it into the main script. This is way easier than changing the script and running the entire thing over, and over, and over until you get it right (or give up).
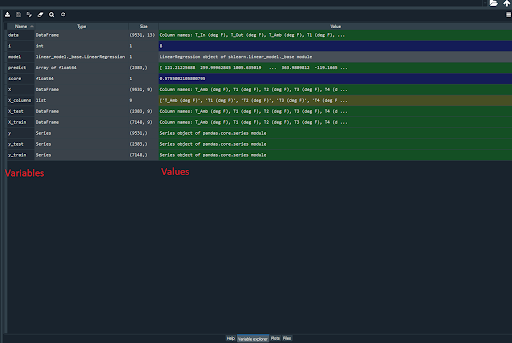
Variable Explorer
In the top right corner of the image below, you see the Variable Explorer. This tool shows you the names and values of all variables Spyder has stored while running your script (highlighted by red text). This helps you make sure your script is working correctly (or find bugs if it isn’t).
When writing code, I often write the script one line at a time, and constantly check to make sure the new line works correctly by running the script with known inputs. Then I can check each value in the Variable Explorer and make sure they’re right.
Here’s a (perhaps oversimplified) example: If I write a script to add three and seven, I can check the Variable Explorer to ensure that the result is 10 and not 9,000. You can also open Pandas DataFrames in a window to thoroughly explore every value it stores, and search for errors that may have arisen.
Debug Tool
Perhaps the best Spyder function is the “debug” tool dropdown window.
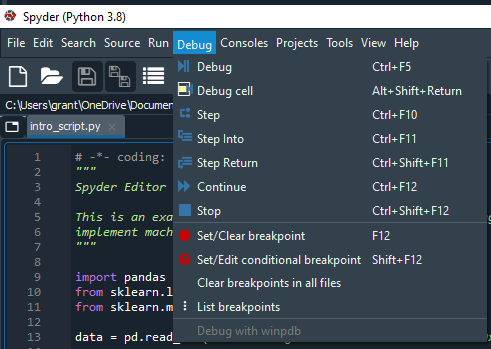
You can see that I have the debug window opened. The window includes powerful options such as “Set/Clear Breakpoint” and “Step Into.” Those two commands provide immense debugging power because you can tell the script when to stop and when to advance while it runs.
Spyder will pause running a program when it reaches a breakpoint you added and “Step Into” will advance to the next breakpoint. This allows you to move through your code a few lines at a time, which allows you to check the Variable Explorer at different states in the process, and helps you find the exact spot where things are going wrong.
Package Managers in Anaconda
Packages are the main reason Python is considered so powerful and Anaconda provides excellent package manager tools. One of the main strengths of Python is that industry experts have created useful open-source Python-language tools such as Matplotlib, Scikit-learn, and TensorFlow. A package manager gives you the ability to download these free packages, import them into your environment and use them at will.
Here’s a snippet of my Anaconda package manager.
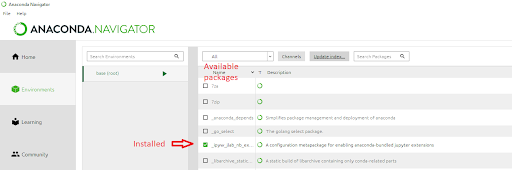
In the main window you see a list of packages that are available in Anaconda’s package manager. The fifth package, marked with a green box and a white checkmark, is the only package installed in my environment; the rest are packages that are available for installation.
Package Manager Advantages
Easy Package Access
The package manager is useful for a few reasons. First, it can provide easy access to several different packages. If I want to install the other ones, I merely click on the checkbox and hit an “Apply” button that appears in the bottom-right corner.
The following image highlights this process in the example of installing the arviz package. Since that two-step process is all that’s necessary to install new packages, the package manager makes installing new packages available in Anaconda quite simple.

Built-In Package Updating
Second, the package manager provides a good interface for updating the packages. If a package has available updates you can right click on the checkbox, mark it for update, then hit the apply button. The following image shows me marking my Pandas package for an update.
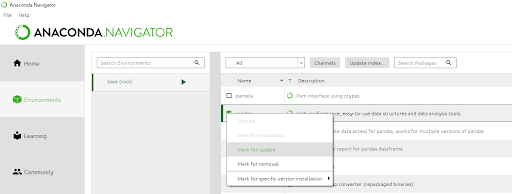
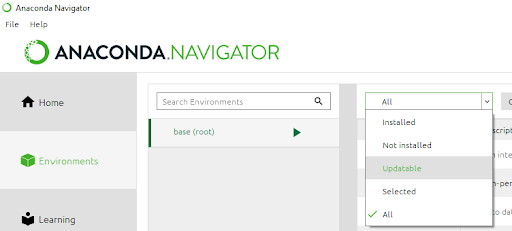
The dropdown window in the upper left labeled “All” even has an “Updatable” option, so you can even see a list of only the packages ready for an update.
Shows Different Environments You Have Stored
You can also see, to the left of the main window, a smaller window with the text “base” in it. This window provides the list of different environments you’re storing on your computer. This is a handy feature because sometimes packages only work with older versions of other packages. So, if you update all your packages you might break your code, which would be bad.
But let’s say there’s a package that you need fully updated to interface with a package in one script, and also need an old version to interface with a different package in another script. Normally this would be a massive pain but with different environments it simply means you only update the package in one environment. You can use your different environments to store versions of packages as needed.
Allows Package Installation Using pip or conda Commands
Finally, not every package will be available in Anaconda’s package manager. Sometimes packages are too new, or too niche, and don’t make it into the Anaconda system. So what do you do?
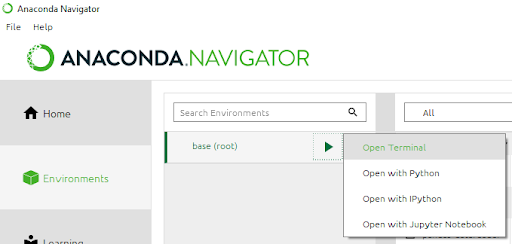
You can still install them using pip or conda commands. To do so, click on the arrow to the right of “base” and select to open a terminal window, as shown in the following image. If you do, you'll be able to type the necessary command to install the package to the base environment. If you need to install a package this way, the correct code to type into the terminal will be written on the website. For example, I just found a package for interfacial molecules analysis (whatever that is) on conda-forge that you can install by typing conda install -c conda-forge pyti’.
And that’s it! Now you know why I like the Anaconda distribution so much, how to get Python installed, some of the advantages of the most powerful IDEs and how to ensure you have the packages you need to program in Python.