If you happen to run into this error when using PyTorch — cuda runtime error (59): device-side assert triggered — you know how frustrating it can be. The most frustrating part for me was the lack of a clear, step-by-step solution to this problem.
I first encountered this problem while working on the Stanford car data set during a hackathon for the Udacity PyTorch Challenge. It took me a while to fix it, and it didn’t help that I was using Kaggle Kernels, which presented its own challenges in regards to GPU.
What Is a CUDA Error: Device-Side Assert Triggered?
What Causes a CUDA Error: Device-Side Assert Triggered?
The following two reasons cause a CUDA error to occur:
- Inconsistency between the number of labels/classes and the number of output units
- The input of the loss function may be incorrect.
Let’s unpack these reasons and their solutions below.
1. Inconsistency Between the Number of Labels and Output Units
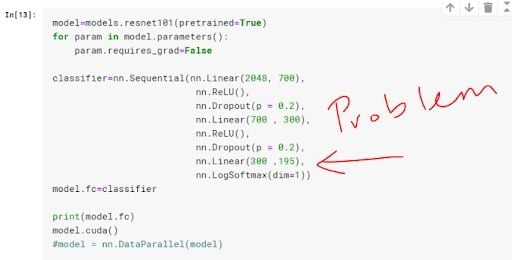
When defining the final fully connected layer of my model, instead of putting 196 — the total number of classes for the Stanford car data set — as the number of output units, I put 195.
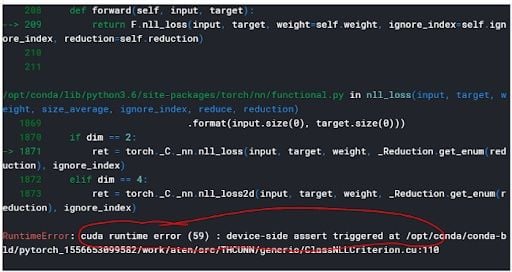
The error is usually identified in the line where you do the backpropagation. Specifically, the error tends to trigger when computing the loss function before backpropagation. Your loss function will be comparing the output from your model and the label of that observation in your data set. Just in case you are confused between labels and output, I define them as:
- Label: These are the tags associated with an observation. When working on a classification problem, the label is the class. For example, in the classic dog vs. cat problem, the labels are cat and dog.
- Output: This is the predicted “label” from your model. You give your model a set of features from an observation, and it gives out a prediction called “output” in the PyTorch ecosystem. Think of it as a predicted label.
In my case, some of the labels had a value of 195, which was beyond the range of output for my model in which the greatest possible value was 194 (you start counting from zero). This triggered the error.
How Do You Fix This Error?
Make sure the number of output units match the number of your classes. That would involve changing my classifier to be as follows:
classifier = nn.Sequential(nn.Linear(2048, 700),
nn.ReLU(),
nn.Dropout(p = 0.2),
nn.Linear(700 , 300),
nn.ReLU(),
nn.Dropout(p = 0.2),
nn.Linear(300 ,196), #changed this from 195 to 196
nn.LogSoftmax(dim = 1))
model.fc = classifier
This is how you get the number of classes in your data set programmatically:
#.classes returns a list of the classes in your dataset, usually #numbered from 0 to number_of_classes-1
len(dataset.classes)
#Calling len() function on the list will return the number of classes in your dataset
Reason 2: Wrong Input for the Loss Function
Loss functions have different ranges for the possible inputs that they can accept. If you choose an incompatible activation function for your output layer, it will trigger this error. For example, BCELoss() requires its input to be between zero and one. If the input (output from your model) is beyond the acceptable range for that particular loss function, the error will get triggered.
What Are Activation Functions and Loss Functions?
Activation functions are the mathematical equations that determine the output of your neural network. The purpose of the activation function is to introduce non-linearity into the output of a model, thus making a model capable of learning and performing more complex tasks. In turn, they determine how accurate your network will be.
Loss functions are the equations that compute the error that is used to learn via backpropagation.

How to Resolve a CUDA Error: Device-Side Assert Triggered in PyTorch
Make sure your output layer returns values in the range of the loss function (criterion) that you chose. This implies that you’re using the appropriate activation function (sigmoid, softmax, LogSoftmax) in your final output layer.
Example of Problematic Code
model = nn.Linear()
input = torch.randn(128, 2)
output = model(input)
criterion=nn.BCELoss()
torch.empty(128).random_(2)
loss=criterion(output, target)
The code above will trigger a CUDA runtime error 59 if you are using a GPU. You can fix it by passing your output through the sigmoid function or using BCEWithLogitsLoss().
Solution 1: Pass the Results Through Sigmoid Function
model = nn.Linear()  #The sigmoid funtion can also be applied here as model=nn.Sigmoid(nn.Linear())
input = torch.randn(128, 2)
output = model(input)
criterion=nn.BCELoss()
target=torch.empty(128).random_(2)
loss=criterion(nn.Sigmoid(output), target)
Solution 2: Using “BCEWithLogitsLoss()”
model = nn.Linear()
input = torch.randn(128, 2)
output = model(input)
criterion=nn.BCEWithLogitsLoss() #changed fromBCELoss
target = torch.empty(128).random_(2)
loss=criterion(output, target)
Fixing CUDA Error: Device-Side Assert Triggered on Kaggle
Once that error is triggered, you cannot continue using your GPU for Jupyter-based environments like Kaggle. Even after changing the problematic line and reloading the entire kernel, you will still get the error presented in different forms. The form depends on which line is the first one to attempt to use the GPU. Look at the image below for an idea.
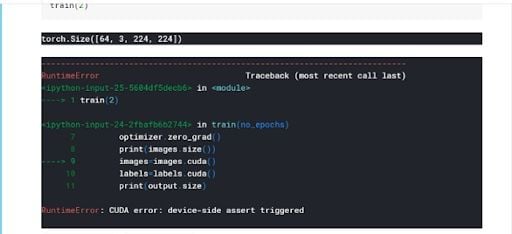
The reason this happens is that even though you may have fixed the bug in your code, once the runtime error 59 is triggered, you are blocked from using the GPU entirely during the same GPU session in which the error was triggered.
The Solution
Stop your current kernel session and start a new one.
To do this, follow the steps below:
- From your kernel, click the ‘K’ on the top left. It automatically takes you to your kernels
- You will see a list of your kernels, which will have have edit option and additional stop for the ones currently running.
- Click “Stop kernel.”
- Restart your kernel session fresh. Every variable should reset, and you should have a brand new GPU session
CUDA Error: Device-Side Assert Triggered Tips
The error messages you get when running into this error may not be very descriptive. To make sure you get a complete and useful stack trace, enter CUDA_LAUNCH_BLOCKING="1" at the very beginning of your code and run it before anything else.
Frequently Asked Questions
What is a CUDA error?
A CUDA error is an issue that occurs while running code on an Nvidia GPU using CUDA (Compute Unified Device Architecture), Nvidia’s parallel computing platform. These errors include invalid memory access, corrupted GPU contexts, improper device usage and more.
How do I catch a CUDA error?
To catch a CUDA error in PyTorch, wrap your code in a try-except block and check for specific error messages like "CUDA out of memory" in the exception. This allows you to handle issues gracefully, such as by printing a warning or calling torch.cuda.empty_cache() to free memory. However, after a CUDA error, you may still need to restart the Python kernel to fully reset the GPU state.
What does CUDA stand for?
CUDA stands for Compute Unified Device Architecture. It is a parallel computing platform and programming model developed by Nividia for general-purpose computing on graphical processing units (GPUs).
What does "CUDA error: device-side assert triggered" mean?
A cuda runtime error (59): device-side assert triggered is an error that can occur when there is an inconsistency with the number of labels and output units in a model or there is an incorrect input for a loss function in PyTorch.
How to fix “CUDA error: device-side assert triggered” error?
This error can be fixed by:
- Ensuring your output units match the number of classes – Check your dataset’s class count using
len(dataset.classes)and update your model’s classifer accordingly. - Ensuring your loss function receives correct inputs – Ensure the activation function in your output layer aligns with the loss function’s expected input range (e.g., use
SigmoidwithBCELoss()or switch toBCEWithLogitsLoss()). - Restarting the kernel if using Kaggle – Once this error occurs, GPU operations are blocked. As such, stop and restart the kernel to reset the session.
- Improving debugging – Add
CUDA_LAUNCH_BLOCKING=1at the start of your code to get a more detailed error message if the error happens again.
How do I fix a CUDA error for out of memory?
A “CUDA out of memory” error means your GPU doesn’t have enough memory to handle the operation. There are several ways to fix or work around this. You can:
1. Reduce training batch size until the error goes away.
2. Use torch.cuda.empty_cache(). This will clear unused memory, which can be helpful between training loops or model evaluations.
3. Use with torch.no_grad() during inference. This will save memory by disabling gradient tracking when you’re not training.
4. Reduce model size by either reducing the number of layers or having smaller embeddings.
5. Restart the kernel/script. This may clear up persistent GPU memory that did wasn’t released properly.