

Python virtual environments allow developers to control software dependencies in Python code. Software dependency means that a given piece of software requires one or more other software packages or libraries to run successfully. For example, TensorFlow, a deep learning library in Python, requires another Python package called NumPy to run.
Virtual environments are useful ways of ensuring that the correct package/library versions are consistently used every time the software runs. This helps isolate software projects from potentially conflicting libraries and packages that are installed on an operating system. Conflicting software packages may result in a piece of software failing.
Further, virtual environments ensure that the results from running code are reproducible. Reproducibility is an essential part of software development and software testing because it guarantees that software programs run and work as intended. If a software program’s results can’t be reproduced, it won’t be able to reliably perform the task it was developed to complete.
What Are Python Virtual Environments?
Python virtual environments allow developers to control software dependencies in Python code. They’re useful ways of ensuring that the correct package/library versions are consistently used every time the software runs. Virtual environments also help ensure that the results from running code are reproducible.
When to Use a Virtual Environment
Working within a Python virtual environment is generally a good idea when developing Python code because they provide ways to control the behavior of a software program. If code is written to generate a specific output given a known input, the same output should be reliably generated for that input whether the code is run on my computer, a remote machine, or someone else’s laptop. Developing software without a virtual environment defined increases the risk of the code failing or producing undesired results.
Using virtual environments is even more important when you’re working with a larger Python development project that includes many libraries, files, and Python scripts. As code becomes more complex, bookkeeping software dependencies is even more complex as there is an increased risk of package mismanagement and, consequently, the existence of error-producing code.
If you’re a developer working on multiple Python projects in parallel, you should use distinct virtual environments for each project. This practice makes working on multiple projects more organized and also reduces the risks of code execution errors. Also, if you’re collaborating on a large Python development project, using virtual environments will make collaboration easier because collaborators can be confident that they’re using the right versions of each software library that is required for the code to run. Further, it makes debugging easier since it reduces the risk of bugs due to package mismanagement.
Benefits of Virtual Environments
Virtual environments have many benefits including easier dependency management and reduced risk of package conflicts and errors caused by software deprecation. Software dependency management is the process of bookkeeping software versions needed for a piece of software to run. Package conflicts arise when two or more software packages are incompatible, causing a piece of software to fail to run. Software deprecation occurs when a part or all of a software program or library changes or is removed.
To understand the importance of virtual environments, let’s consider the example of software deprecation. The statistical analysis library Pandas used to have a method called ix that was used to locate rows and columns by name or by index. Upon getting updated, the ix method was deprecated and replaced with new methods called iloc and loc. Consider a Python script that uses an old version of Pandas that uses the ix method to locate columns by name. Without the use of virtual environments, if an updated or newer version of Pandas runs this Python script, the code will fail to execute because, in a newer version of Pandas, the ix method no longer exists. With virtual environments, however, you can define the older version of Pandas that allows you to use the ix method without issue. This method means that the behavior of the code won’t change unexpectedly because the version of Pandas is being mismanaged.
Virtual environments also prevent system failures due to package conflicts. For example, certain versions of NumPy and TensorFlow conflict, which can result in system failures if you fail to consider package versions. This can mean unexpected performance issues or compatibility conflicts. Specifically, NumPy 1.20.0 has been reported to conflict with TensorFlow 2.5.0 due to the discrepancies in how each one defines matrix multiplication. If you install these two package versions without considering this conflict, you may get code execution errors. Conversely, with virtual environments, you can define versions of Tensorflow and NumPy that are compatible and avoid issues.
Using virtual environments makes dependency management more straightforward and also reduces the risk of package conflicts. Both of these benefits help ensure the reproducibility of code results. If you specify the exact versions of libraries and packages that the system requires, software updates won’t result in errors and bugs. Further, managing dependencies and minimizing package conflicts makes collaborating on software development much easier because each developer will have full knowledge of existing package requirements, which can be used to reliably inform how new package dependencies are incorporated.
Many packages in Python allow you to create and manage virtual environments. Conda is a commonly used one in data science. It is part of the Anaconda distribution, which is convenient since many data scientists and machine learning engineers likely also use Anaconda.
Step-by-Step Guide to Python Virtual Environments
The workflow for creating and managing Python virtual environments is as follows:
- Create Python virtual environment.
- Install packages in Python virtual environment.
- Activate Python virtual environment.
- Deactivate Python virtual environment.
An interesting use case is creating and managing Python virtual environments for exploratory data analysis (EDA) tasks. For example, we can create a virtual environment for exploratory data analysis of the Synthetic Credit Card Transaction data available on DataFabrica. The data contains synthetic credit card transaction amounts, credit card information, transaction IDs and more. The free tier is free to download, modify, and share under the Apache 2.0 license.
1. Create Python Virtual Environment
To start, navigate to the Anaconda website and follow the instructions for installing Conda:

Next, follow the instructions for verifying your installer hash here. Once you verify your install hash, double-click the download .pkg file and follow the instructions to complete installation. You can test whether the installation was successful by entering the command conda list in a terminal window.
Next, to create a Conda virtual environment, we use conda create –name myenv, where “myenv” is the name of our environment. Since we will be creating an environment for performing EDA on credit card transaction data, let’s name our environment to reflect. Let’s create an environment called “cc_data_eda_env”:
conda create –name cc_data_eda_envUpon running this command, we will see a message asking if we would like to proceed:
Proceed ([y]/n)?Type y and press enter:
Proceed ([y]/n)? yWe should see the following output:
Preparing transaction: done
Verifying transaction: done
Executing transaction: done
#
# To activate this environment, use
#
#     $ conda activate cc_data_eda_env
#
# To deactivate an active environment, use
#
#     $ conda deactivate
2. Install packages in Python Virtual Environment
We see that the output gives instructions on how to activate and deactivate our newly created Conda environment. The environment we created is empty. We can also create the same environment where we specify the specific Python packages we would like installed in our environment. Plotly is one commonly used Python library for data visualization and EDA. Let’s create this environment again with the Plotly library installed. To do this, in the same Conda create command from earlier, we just put the name of the package we’d like to install after the name of our environment:
conda create –name cc_data_eda_env plotlyUpon running this code, we will be asked if we would like to remove the old version of the cc_data_eda environment. Type y and press enter. We will see a long message specifying all of the Plotly dependencies that will be installed in addition to Plotly itself:

To proceed with creating the environment, press y. We should see an output showing the installation progress for each package.
Finally, we can specify an environment.yml file to specify the list of packages we would like installed. This makes managing dependencies easier, especially when we require a large number of package installations. This is because, with an environment.yml file, you have an exhaustive list of all the packages and their versions, needed for your software to run, easily accessible. Without this, you would need to comb through a long list of installed packages on your machine, find the packages that your programs use and their respective versions. On a laptop or personal desktop computer, the packages that a software program uses are most likely a small subset of the long list of packages installed on a personal computer. This makes the task of managing software packages and their versions inefficient and in some cases not possible.
Let’s create an environment.yml file using the following command:
vi environment.ymlAnd let’s list the following package in our environment.yml file:
name: cc_data_eda_env
channels:
  - defaults
dependencies:
  - python=3.11.4
  - pandas=1.5.3
  - numpy=1.25.2
  - matplotlib=3.7.1
  - seaborn=0.12.2
  - plotly=5.9.0
We can then create an new environment using our environment.yml file:
conda env create -f environment.ymlUpon running the code, we should see the following output:
3. Activate Python Virtual Environment
Once we are finished creating the environment, we can activate it using the following command in terminal:
conda activate cc_data_eda_envThe name of the environment in parentheses should indicate the activated environment:
(cc_data_eda_env) user:user_directory user.name$Now that our environment is activated, we can define some logic that uses these packages. To proceed, make sure the csv file is in the same directory as your yaml file. Next, let’s create a Python file called cc_eda.py:
vi cc_eda.pyIn this file, let’s import each of the packages:
import pandas as pd
import numpy as np
import seaborn as sns
import matplotlib.pyplot as plt
import plotly
Next, let’s read our data into a Pandas DataFrame:
df = pd.read_csv()Let’s display the first five rows of data:
print(df.head())Now exit the Python file and run:
python cc_eda.py
Next, let’s perform some logic using NumPy methods. Let’s take the log transform of the transaction_amount and store the values in a new column called “log_transaction_amnt”:
df['log_transaction_amnt'] = np.log(df['transaction_amount'])

print(df.head())
Then let’s rerun our Python script:
python cc_eda.py
Next, let’s generate a time series line plot of the transaction_amount overtime. This will require both Pandas operations and Matplotlib methods.
First, let’s format our date column:
df['transaction_date'] = pd.to_datetime(df['transaction_date'])Filter our data to consider a single merchant:
df= df[df['merchant_name'] == "Cheesecake Factory"]Remove outliers:
z_scores = np.abs((df['transaction_amount'] - df['transaction_amount'].mean()) / df['transaction_amount'].std())
# Define a threshold (e.g., Z-score > 3) to identify outliers
threshold = 3
# Remove outliers from the DataFrame
df = df[z_scores < threshold]
Define our grouping column:
df['year'] = df['transaction_date'].dt.year
df['year'] = df['year'].astype(str)
df['month'] = df['transaction_date'].dt.month
df = df[df['month'] <= 12]
df = df[df['month'] >= 1]
df['month'] = df['month'].astype(str)
df['month_year'] =  df['year'] + "-"+  df['month']
df['month_year'] = pd.to_datetime(df['month_year'])
Perform a groupby sum on month_year:
df_grouped = df.groupby('month_year')['transaction_amount'].sum().reset_index()
df_grouped = df_grouped.set_index('month_year').sort_index()
df_grouped.index = pd.to_datetime(df_grouped.index)

And plot our time series:
plt.plot(df_grouped.index, df_grouped['transaction_amount'])
And plot our time series:
plt.plot(df_grouped.index, df_grouped['transaction_amount'])And rerun:
python cc_eda.py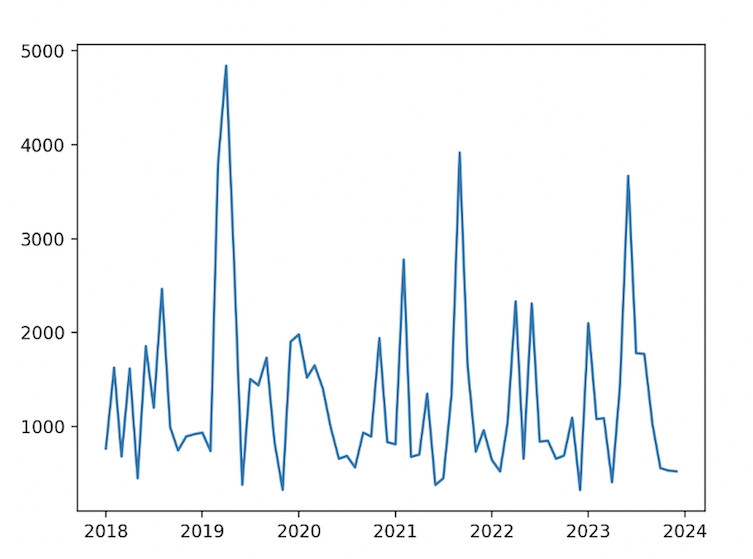
We can also add logic that includes Seaborn methods and operations:
data = df[['transaction_amount', 'log_transaction_amnt']]
sns.pairplot(data)
plt.show()
And rerun:
python cc_eda.py
Finally, we can generate a geomap of customer counts in the U.S. using Plotly express. The logic below uses a state name abbreviation mapping dictionary that is omitted for clarity:
df['merchant_state_abbr'] = df['merchant_state'].map(state_abbreviations)
state_counts = df.groupby('merchant_state_abbr')['cardholder_name'].nunique().reset_index()
state_counts.columns = ['State', 'Customer_Count']
fig = px.choropleth(state_counts, locations='State', locationmode='USA-states',
                    color='Customer_Count', scope='usa',
                    color_continuous_scale='Blues',
                    title='Number of Customers by State')
fig.show()
It’s worth noting that we’re only able to use the Python packages we’ve specified in the requirements.txt file. For example, if we were to try to import and use a method in Scikit-learn, we would get a package not found error:
from sklearn.linear_models import LinearRegressionAnd when we run:
    from sklearn.linear_models import LinearRegression
ModuleNotFoundError: No module named 'sklearn'
In order for this script to run successfully, we need to update our environment.yml file with the package name, sklearn, and the version:
name: cc_data_eda_env
channels:
  - defaults
dependencies:
  - python=3.11.4
  - pandas=1.5.3
  - numpy=1.25.2
  - matplotlib=3.7.1
  - seaborn=0.12.2
  - plotly=5.9.0
  - sklearn=1.30
We then need to deactivate our environment and create a new environment with the new environment.yml (you can choose a new name or keep the old name as long as the old environment has been removed).
4. Deactivate a Python Virtual Environment
Deactivating a Conda environment is straightforward. You simply enter the following command in the terminal:
conda deactivateUpon running this command, you should no longer see the environment name in parentheses preceding the username and present working directory:
user:user_directory user.name$
Use Python Virtual Enivornments
Python virtual environments are important tools for anyone developing code in Python. They make defining and managing code that depends on multiple software packages easier, as well as debugging code, preventing software conflicts, performing tests, and collaborating with other developers. Oftentimes, software bugs are due to deprecated software libraries, which can easily be detected in a managed virtual environment.
Further, some Python libraries conflict with each other, and knowing the exact versions of each library in use makes identifying software conflicts or incompatibilities easier. Further, once software code is developed, it often has to go through rigorous testing. This process requires that developers know the variables, such as library versions and that they stay constant. After all, if you’re testing to figure out what causes the software to break, you want to make sure that the case being tested is not due to library mismanagement. All of these factors make software development collaboration much easier, which ultimately leads to faster code development overall. Understanding Python virtual environments is an invaluable skill for anyone who uses Python programming in their day-to-day work.
The code used in this post is available on GitHub. A free sample of the data used in this article is available here. The full data set can be found here.


