Fauna has been a class apart from most databases around. It provides amazing flexibility and scalability. Since Fauna is serverless, you can connect to the database and use it without worrying about anything else.
You can use Fauna as an OLTP (online transaction processing) database with distributed ACID (atomicity, consistency, isolation, durability), as a document database, or even a simple key-value based NoSQL. It also includes support for enterprise features like configurable data retention and hierarchical multi-tenancy.
Why Use FaunaDB?
Importantly, Fauna doesn’t bind you to the cloud. It’s available as a managed cloud service or a downloadable JAR, machine image or container that you can run on premises.
Fauna Features
Fauna provides extreme flexibility, allowing you to tweak several parameters based on the requirements of your project. We can use Fauna as a traditional relational database, key-value, document-based or graph database. We can either enforce a schema on the data, or just let it loose.
Fauna is extremely versatile. We can run Fauna in the cloud (as a serverless database with a generous free tier), on premises, or as an embedded database, right inside our application. Along with these extremes, it also provides the most common forms of deployment like machine images and docker images.
All this comes with very high performance and ACID transactions — everything an architect would want for an application.
Fauna Console
While Fauna provides an elegant command shell for the cloud DB, let’s start with the web console, which is the easiest way to jump in.
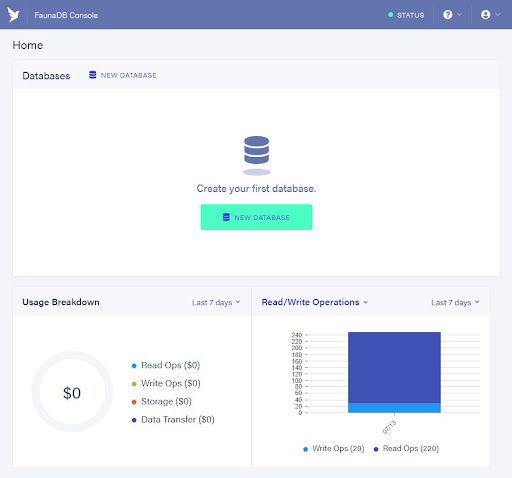
Once you sign up, you’ll see the dashboard, which looks like this:

Create Database
To create a database, you’ll start by clicking New Database (pretty intuitive!). Once you provide the DB name, you’re done; now you have a new DB instance for your application. If you just want to practice, you can choose the option to fill the DB with dummy data or you can add your own data.
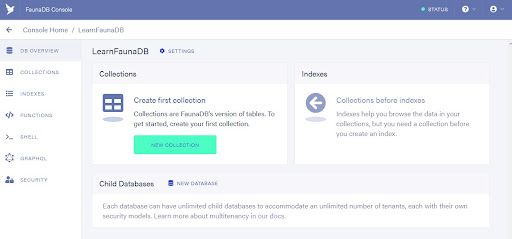
With that, you have a clean database instance.

Create Collection
Of course, the next step is to create a collection. Fauna offers some choices when we create a new collection.
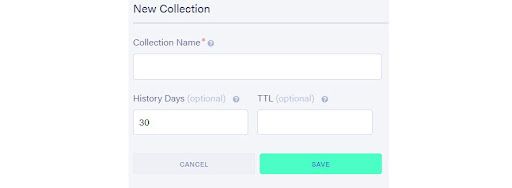
The create collection page looks like this:

Along with the collection name, we have two options. The History Days and the TTL (Time To Live) for each record. History Days are the number of days Fauna will retain the history of documents (in case you want to undo a change). If we clear this field, the history is retained forever. Naturally, the history data is also data that’s charged on the cloud, so you’ve got to be careful when choosing this number.
The TTL defines the number of days an untouched document stays in the collection after the last write. It’s quite helpful to set a reasonable value to TTL, as it can help reduce costs.
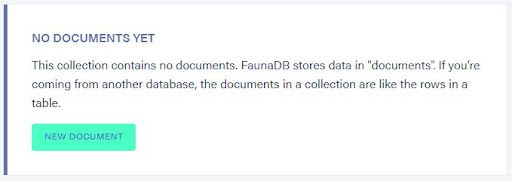
Finally, we hit save and — boom — you’ve created a new collection. Now you should see a clean UI to add new documents to the collection.
Create Document

Clicking that button shows us a text box where we can type in the JSON for the new document we want to add to our collection.
The console also provides several other options for creating index, custom functions, adding a GraphQL schema and also for creating security keys for accessing the database.
If you’re bored with the UI, the console provides a link for opening the shell. Here, we can type in the required commands to work with the database. In fact, Fauna also allows us to open a shell on our local terminal that can interact with the database. Let’s check it out.
Fauna Shell
Anyone serious about building real-world applications should drop the web console and get back to the black screen. That is the best way to develop. Fauna provides a very good CLI (command-line interface) and a NodeJS based shell for communicating with the application on the cloud.
Let’s start with the installations. If you’ve gotten this far, I’m fairly sure you know how to install NodeJS and npm (if they’re not already installed). So let’s start beyond that point. We have to install the Fauna shell using the npm.
npm install -g fauna-shellThere you go. Npm gathers all that you need to run the Fauna shell and sets it up.
Next, we log into our Fauna cloud account.
fauna cloud-loginThis asks for the email and password we used to sign up. It also has an option to login with a key.
Create Database
As we did from the console, the first step is to create the new database.
fauna create-database my-dbThis shows some logs about creating the DB and then confirms the successful creation.
Once you’ve created the database, we open the Fauna shell for the given database.
fauna shell my-dbThis shows the output below and then opens the Fauna shell.
Starting shell for database my-db
Connected to https://db.fauna.com
Type Ctrl+D or .exit to exit the shell
my-db>
Create Collection
Now we’re finally ready to play with data. It’s time to create the collection.
my-db> CreateCollection({name:"blog-posts"})This creates a new collection, confirmed by the shell as:
{ ref: Collection("blog-posts"),
 ts: 1594633187440000,
 history_days: 30,
 name: 'blog-posts' }
The ts: 1594633187440000 is the timestamp for this transaction and will be different when you do it yourself.
Create Index
We created a collection that would hold all my blog posts. The collection has to be indexed to enable querying. A natural candidate for the index is the blog title. Let’s create that index here.
my-db> CreateIndex({name: "posts_by_title",
... source: Collection("blog-posts"),
... terms: [{field: ["data", "title"]}]})
The Fauna shell confirms creation of the index by this log:
{ ref: Index("posts_by_title"),
 ts: 1594633307405000,
 active: true,
 serialized: true,
 name: 'posts_by_title',
 source: Collection("blog-posts"),
 terms: [ { field: [ 'data', 'title' ] } ],
 partitions: 1 }
Create Document
Now that we have a collection and the index ready, we start adding data to it. Here’s how:
my-db> Create(Collection("blog-posts"),
... {data: {title: "FaunaDB: An Introduction",
..... content: "FaunaDB is a wonderful Database. You must use it in your application"}})
The Fauna shell confirms it with something like this.
{ ref: Ref(Collection("blog-posts"), "270925464408687111"),
 ts: 1594633507130000,
 data:
  { title: 'FaunaDB: An Introduction',
    content:
     'FaunaDB is a wonderful Database. You must use it in your application' } }
It’s inefficient to type each record one by one and, at this point, you might be saying the web console was better. Luckily, the Fauna shell provides us with interesting ways of adding multiple records at once.
my-db> Map([{title: "Title 1", content: "Content 1"},
...             {title: "Title 2", content: "Content 2"},
...             {title: "Title 3", content: "Content 3"}],
...     Lambda("post", Create( Collection("blog-posts"), {data: Var("post")})))
You can see this in the log below.
[ { ref: Ref(Collection("blog-posts"), "270925725483140613"),
   ts: 1594633756110000,
   data: { title: 'Title 1', content: 'Content 1' } },
 { ref: Ref(Collection("blog-posts"), "270925725483139589"),
   ts: 1594633756110000,
   data: { title: 'Title 2', content: 'Content 2' } },
 { ref: Ref(Collection("blog-posts"), "270925725483141637"),
   ts: 1594633756110000,
   data: { title: 'Title 3', content: 'Content 3' } } ]
Here, we added three documents at once. Note that you don’t need to type the list of three documents we feed into the map here. The list can come out of any external source.
There! Now, we can really see the power of this shell.
Query Documents
Now, let’s try to fetch records from the collection. There are two ways to query this data. You can either use the ID or the index.
Note in the above create operations, we got a number — 270925464408687111 — in the confirmation. You can use this to query the record.
my-db> Get(Ref(Collection("blog-posts"), "270925725483139589"))This returns the record we just inserted.
{ ref: Ref(Collection("blog-posts"), "270925725483139589"),
 ts: 1594633756110000,
 data: { title: 'Title 2', content: 'Content 2' } }
Of course, this is a boring way to query the data. Why did we make the index? Let’s use that index to query the required record.
We can query the same record using the index on title that we created above.
my-db> Get(Match(Index("posts_by_title"), "Title 2"))It returns the same record.
{ ref: Ref(Collection("blog-posts"), "270925725483139589"),
 ts: 1594633756110000,
 data: { title: 'Title 2', content: 'Content 2' } }
That was just a glimpse of what we can do with the web console and shell. Fauna has very good documentation. You can check out the Cookbook on their website for a good collection of code snippets for various use cases.
Frequently Asked Questions
What is Fauna used for?
Fauna can be used as an OLTP database supporting ACID transactions, and functions as a relational, key-value, document-based or graph database.
Is Fauna a serverless database?
Yes, Fauna is serverless, allowing users to connect without managing infrastructure.
Can Fauna be run outside the cloud?
Yes, Fauna can be deployed using JARs, machine images or containers, enabling on-premises or embedded use.
What is the Fauna web console used for?
The web console allows users to create databases, collections, documents, indexes and manage data using an intuitive interface.


