

Do you know the basics of Java or Processing and want to start developing your own games or maybe just recreate one of the classics? This article describes the process of building the classic Snake game using Processing.
How to Create the Classic Snake Game With Processing Library and Java
1. What Is Processing?
Processing is a graphical library and integrated development environment (IDE). The library is built on Java and provides additional classes and simplifications. You can download and install Processing; make sure to download the installable matching your preferred platform.
Application Flow
Processing provides many methods to control the flow of an application, for example: control key events, initialization or continuous behavior. Two important methods to know to get started with Processing are the methods setup() and draw(). Another built-in method I’ll introduce later is keyPressed(). The behavior of the three methods are:
setup()is called one time when the application starts.draw()executes forever and is called a number of times matching the frame rate.keyPressed()executes when a key is pressed, and the key is stored in a variable named key.
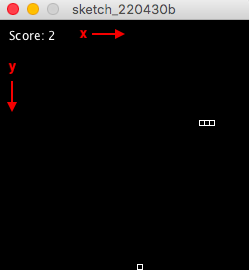
Graphical Interface
Processing also provides a graphical interface where the point (x, y) = (0, 0) is at the left top corner (see figure one below). Drawing shapes within Processing is very simple because the library provides primitive two-dimensional methods such as rect(x, y, w, h), circle(x, y, r) or line(x1, y1, x2, y2).
2. Prepare to Create the Classic Snake Game
As with every project, it can be a great idea to establish a couple of requirements to set the direction and outline an overview of necessary features. Here are the requirements of the game, followed by a description of the code further below.
Requirements
The requirements for the game are:
- The snake and objective are drawn using rectangles.
- The first rectangle of the snake represents the head of the snake and it is only the head that can trigger collision events with the objective and tail.
- When the snake reaches the screen’s border, it is teleported to the opposite position.
- The objective gets a new random position when it collides with the snake’s head.
- The game ends if the snake’s head collides with its tail.
- The score increases whenever the snake collides with the objective.
3. How to Code the Classic Snake the Game
To keep the article simple, the following section is divided into different steps of coding the game.
Property Data Types
Here is a short overview of the data types used to add properties to the game. Boolean and float are primitive data types; boolean refers to a value that can be either true or false, and float refers to a number that, unlike an integer, can specify a whole number and a decimal part.
ArrayList<T> and PVector are composite data types. ArrayList<T> refers to a list of other data types that can be dynamically resized and PVector refers to a two or three-dimensional vector.
Add Properties
The first step is to add global properties that can store information about size, positions, etc. The first two properties to add are gameover and s (see code below). We use the boolean variable gameover to check if the player has lost the game and the float variable s specifies the size of the rectangles representing the objective and the snake.
Display the first two properties of the game:
// A boolean used to check if the game is ended
boolean gameover = false;

// A general size used for the objective
// and snake's head and tail
float s = 5;
When the general properties are in place, it’s time to add the properties for the snake. The snake will require a property specifying the position of each rectangle representing the snake’s tail and head. The snake will also require a property specifying the direction of the snake. To store the positions of the snake’s rectangles, add a property called snakePositions of the type ArrayList<PVector>. To store information about the snake’s direction, add a property called snakeDirection of the type PVector.
This code shows the snake’s properties:
// ...

// All the positions of the snake's head and tail
// snakePositions.get(0) => head
// snakePositions.get(n > 0) => tail
ArrayList<PVector> snakePositions = new ArrayList<PVector>();

// The direction of the snake
PVector snakeDirection = new PVector(1, 0);
The last property the game requires is a variable specifying the positions of the objective. Add a property called objPosition of the type PVector.
This code shows the property of the objective:
// ...

// The position of the objective
PVector objPosition = new PVector(0, 0);
Add Custom Helper Methods
The next section covers a couple of helper methods used to help simplify the explanation of the game. The first method is used to check if the position of two points overlap.
We can define the method’s procedure as follows:
- Expect two vectors specifying the top left corner of a rectangle.
- Find the center position of the rectangle using its size (
s). - Return true if the distance between the center positions is less than the size.
This code shows an implementation of a method that returns true if two points overlap.
// ...

// A method used to check if two vectors overlaps
public boolean overlaps(PVector p1, PVector p2) {
  PVector c1 = new PVector(p1.x + s/2, p1.y + s/2);
  PVector c2 = new PVector(p2.x + s/2, p2.y + s/2);
  return PVector.dist(c1, c2) < s;
}
The next method is used to give a vector a random position.
The method’s procedure is as follows:
- Set the horizontal property (
x) to a random float withinaandb. - Set the vertical property (
y) to a random float withinaandb.
This code shows a method that gives a vector a random position within the given boundaries.
// ...

// A method used to randomize the position
// of a vector within the boundaries
public void randomize(PVector position, float a, float b) {
  position.x = random(a, b);
  position.y = random(a, b);
}
The last two helper methods are reset() and endgame(). reset() is used to set the properties of the game to the same state as at the start of the application and endgame() is used to start the end game functionality.
The procedure of endgame() is:
- Set the
gameoverproperty totrueto signal the game is ended. - Override the current content with a black background.
- Reset the fill color to set the text color to white.
- Display a text saying “
Gameover.”
The procedure of reset() is:
- Set the
gameoverproperty to true to signal the game is NOT ended. - Remove all saved positions from the
snakePositionsproperty. - Define a vector with the position of the screen’s center.
- Add the vector to the
snakePositionsproperty to define the snake’s head. - Set the objective’s position to a random position within the screen’s borders.
This code shows the implementation of a method used to end the game and another used to reset the properties of the game.
// ...

// A method used to end the game
public void endgame() {
  gameover = true;

  // Show a black screen
  background(0);
  // Set text color
  fill(255);
  // Show game over text
  text("Gameover", 10, 20);
}

// A method used to reset the game
public void reset() {
  gameover = false;

  // Clear the positions
  snakePositions.clear();

  // Get screen center position
  PVector c = new PVector(width/2, height/2);

  // Add the snake's head
  snakePositions.add(c);

  // Randomize the position of the obj.
  randomize(objPosition, 0, width-s);
}
Add the Built-In Method: Setup
The next method, the game requires, is the built-in setup method which is called once when the application starts.
The method’s procedure is as follows:
- Set the screen size to 250 x 250 pixels.
- Set the frame rate to 25 frames per second.
- Reset the properties of the game using the helper method:
reset
This code shows the implementation of the built-in method: setup.
// ...

void setup() {
  // Set the screen size.
  size(250, 250);
  // Set the application's frame rate
  // Lower frame rate = slower movement
  // Higher frame rame = faster movement
  frameRate(25);

  // Reset the game's properties.
  reset();
}
Add the Built-In Method: Draw
The built-in method draw() is called continuously until the application is stopped. The code within the draw() method is a bit more complex than other methods presented in the article and the code is, therefore, divided into several parts in the following section.
We can describe the procedure of the code presented below as follows:
- Set the screen’s background to black.
- If the property
gameoveristrue, which means the game is ended, wait five seconds and reset the game. - Set the fill color to white.
- Display a text saying
“Score: {x}” at (x, y) = (10, 20). - Set the fill color to black and stroke color to white.
- Draw the objective.
- Loop the
snakePositionsproperty in reversed order. - Get the current position.
- Check if the current index is equal to the head’s index to define behavior for the snake’s head and add an else statement used to define the behavior for the snake’s tail.
- Draw a rectangle at the current position representing the snake’s tail or head.
This code displays the implementation of the built-in method: draw.
void draw() {
  // Set background color
  background(0);

  // If the game ended
  if (gameover) {
    // Wait 5 seconds
    delay(5000);
    // Reset the game
    reset();
    return;
  }

  // Draw score
  fill(255);
  text("Score: " + (snakePositions.size()-1), 10, 20);

  // Set snake and objective
  // fill and stroke color
  fill(0);
  stroke(255);

  // Draw the objective
  rect(objPosition.x, objPosition.y, s, s);

  // Draw the snake
  for (int i = snakePositions.size() - 1; i > -1; i--) {

      // Get the current position
      PVector position = snakePositions.get(i);

      // If the position is the head
      if (i == 0) {
        // ...
      } else {
        // ...
      }

      // Display the point
      rect(position.x, position.y, s, s);
   }
}
Why loop the snakePositions from the end to the start? The reason is related to the snake’s movement. Whenever the head of the snake moves one time in some direction, each rectangle of the tail also has to be moved one time.
The code is, therefore, designed as follows:
- Start by selecting the last element and set its position to the second last element’s position.
- Select the second last element and set its position to the third last element’s position.
- Continue to select an element and set its position to the position of the element before it, until the first element is reached.
- When the first element is reached, move the position of that element one time towards the direction specified in the property called
snakeDirection.
This code displays the implementation of the snake’s movement:
void draw() {
  // ...

  // Draw the snake
  for (int i = snakePositions.size() - 1; i > -1; i--) {

      // Get the current position
      PVector position = snakePositions.get(i);

      // If the position is the head
      if (i == 0) {
        // Move towards the direction
        position.x += snakeDirection.x * s;
        position.y += snakeDirection.y * s;

        // Check if the position is outside
        // the screen's borders
        // ...

        // Check if the head overlaps with
        // the objective
        // ...

      } else {
        // Check if the tail overlaps if the head,
        // if the tail is not directly attached to the head
        // ...
        // Get the position before
        PVector before = snakePositions.get(i - 1);
        // Set the current element's position to the position before
        position.x = before.x;
        position.y = before.y;
        // ...
      }

      // Display the point
      rect(position.x, position.y, s, s);
   }
}
The draw() method currently moves the position of the snake, checks if the game is ended, and draws the snake and the objective. But it still needs some functionality handling what should happen when the snake reaches the screen’s borders and some other functionality handling when the snake’s head overlaps with the objective or its own tail.
The procedure for when the snake reaches the screen’s borders (L 14–18):
- If the horizontal property (
x) of the snake is less than zero, set the property to the screen’s width. - If the horizontal property (
x) of the snake is greater than the screen’s width, set the property to zero. - If the vertical property (
y) of the snake is less than zero, set the property to the screen’s height. - If the vertical property (
y) of the snake is greater than the screen’s height, set the property to zero.
The procedure for when the snake’s head overlaps with the objective (L 22–29):
- If the position of the snake’s head overlaps with the position of the objective.
- Set the position of the objective to a new random position.
- Get the position of the snake’s last tail element.
- Define a position behind the last tail element.
- Add that position as the new last tail element.
The procedure for when the snake’s head overlaps with one of its tail elements (L 34–39):
- If the tail element is not directly attached to the head and overlaps with the head.
- End the game.
- Stop the loop.
- If the tail element doesn’t overlap, set the position of the tail element.
This code displays the implementation of the functionality handling whenever the snake reaches the screen’s borders and handling overlaps between the snake’s head and tail.
void draw() {
  // ...

  for (int i = snakePositions.size() - 1; i > -1; i--) {
      // ...

      // If the position is the head
      if (i == 0) {
        // ...

        // Check if the position is outside
        // the screen's borders
        // Horizontal
        if (position.x < 0) position.x = width;
        else if (position.x > width) position.x = 0;
        // Vertical
        if (position.y < 0) position.y = height;
        else if (position.y > height) position.y = 0;

        // Check if the head overlaps with
        // the objective
        if (overlaps(position, objPosition)) {
          // Randomize the position of the obj.
          randomize(objPosition, 0, width-s);
          // Increase the snake's tail
          PVector last = snakePositions.get(snakePositions.size() - 1);
          PVector next = new PVector(last.x-snakeDirection.x*s, last.y-(snakeDirection.x*s));
          snakePositions.add(next);
        }

      } else {
        // Check if the tail overlaps with the head
        // Unless it's the point attached directly to the head
        if (i > 1 && overlaps(position, snakePositions.get(0))) {
          endgame();
          break;
        } else {
          // ... (set tail position)
        }
      }

      // ...
   }
}
Add the Built-In Method: keyPressed
The last functionality the game requires is something handling key events.
The directions the snake can move can be defined as follows:
- Left :
(x, y) = (-1, 0) - Right :
(x, y) = (1, 0) - Up :
(x, y) = (0, -1) - Down :
(x, y) = (0, 1)
The procedure for the keyPressed() method is:
- If the ‘a’-key is pressed and if the snake is not moving right, set the direction to left.
- If the ‘d’-key is pressed and if the snake is not moving left, set the direction to right.
- If the ‘s’-key is pressed and if the snake is not moving up, set the direction to down.
- If the ‘w’-key is pressed and if the snake is not moving down, set the direction to up.
This code displays the implementation of the method handling keypress.
// ...

void keyPressed() {
  if (key == 'a' && snakeDirection.x != 1) {
    snakeDirection.x = -1;
    snakeDirection.y = 0;
  }
  else if (key == 'd' && snakeDirection.x != -1) {
    snakeDirection.x = 1;
    snakeDirection.y = 0;
  }
  else if (key == 's' && snakeDirection.y != -1) {
    snakeDirection.x = 0;
    snakeDirection.y = 1;
  }
  else if (key == 'w' && snakeDirection.y != 1) {
    snakeDirection.x = 0;
    snakeDirection.y = -1;
  }
}
Now you’ve got your very own classic snake game.
You can find a full example of the code in my GitHub Gist.
Frequently Asked Questions
What is Processing and how is it used in game development?
Processing is a Java-based graphical library and IDE that simplifies visual programming. It provides built-in methods like setup(), draw() and keyPressed() to manage initialization, rendering and input for interactive applications.
What data structures are used in the Snake game implementation?
The game uses ArrayList<PVector> to track the snake’s body segments and PVector to represent directional movement and positions of game elements like the snake and the objective.
What happens when the snake hits the screen border?
When the snake reaches a screen edge, it wraps around and reappears on the opposite side.


