SQL Server Management Studio (SSMS) is a free integrated tool that allows you to access, configure, manage and administer all components of the SQL server, Azure SQL Database, Azure SQL Managed Instance and Azure Synapse Analytics.
Generally, SSMS only runs on Windows, but there are two ways you can install it on Mac.
What Is an SQL Server Management Studio?
The first way is to install a virtual machine (VM) using programs like VirtualBox, Parallels Desktop, etc. Then you’ll install Windows onto that VM, which requires a payment for the license, and finally, you’ll use the VM to install SSMS.
The second option is to install the SQL server using Docker. Microsoft provides Azure Data Studio as a graphical user interface to run the SQL server on Mac. This article covers the second option.
Docker is a tool designed to make the creation, deployment, and running of applications by using containers much easier. Below are the following steps to run SSMS on Mac.
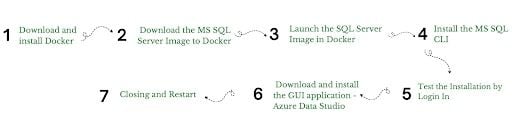
How to Install SQL Server Management Studio on a Mac
7 Steps for Installing SQL Server Management Studio on Mac
- Download and install Docker.
- Download the MS SQL server image to Docker.
- Launch the SQL server image in Docker.
- Install the MS SQL CLI.
- Test the installation.
- Download and install the GUI application — Azure Data Studio.
- Closing and restarting.
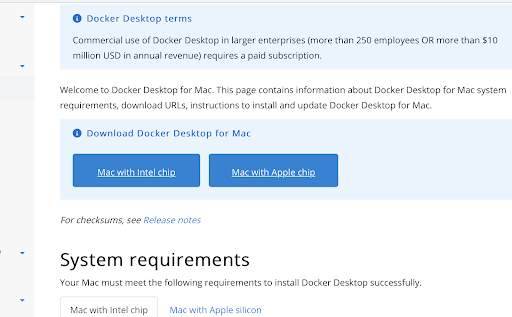
Step 1: Download and Install Docker
Download Docker on Mac. Then you’ll select whether to download it to a Mac with an Intel chip or an Apple chip. In this example, we have used an Intel chip, hence the downloaded intel docker “.dmg” file.
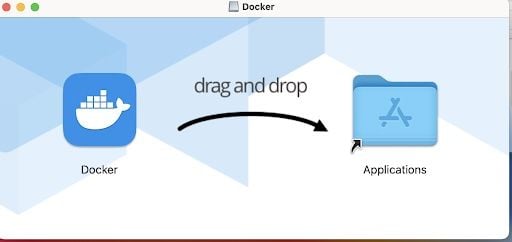
Once you’ve downloaded the “.dmg” file on your Mac, you can drag and drop it into your applications folder.
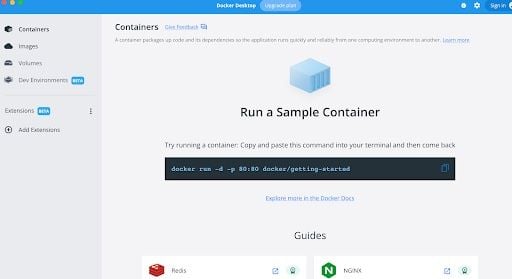
Then open the docker application.
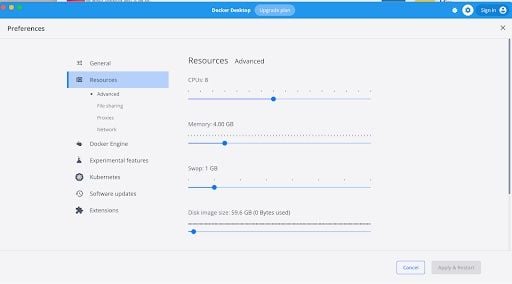
By default, docker allocates 2 GB of memory, and an SQL server needs 3.25 GB to run, so we need to increase the memory to 4 GB in Docker. To do that, go to settings, then preferences, then select the “Resources” screen and slide the memory slider up to at least 4 GB. Click “Apply & Restart.”
Step 2: Download the MS SQL Server Image to Docker
Open the terminal in the Mac and run the following code. This will install the 2022 MS SQL Server image on your device.
sudo docker pull mcr.microsoft.com/mssql/server:2022-latest
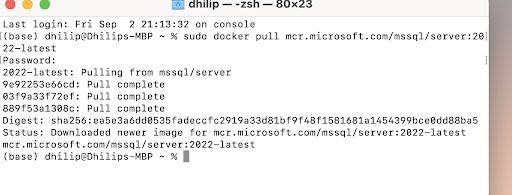
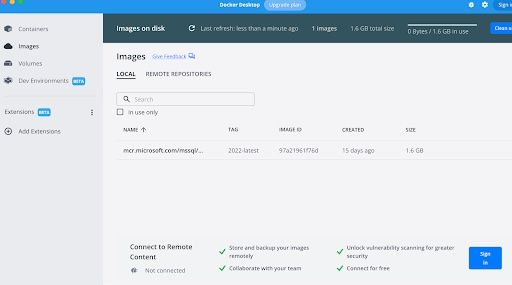
Once we run the above command, Docker will start extracting the image from the web and downloading the same into your local machine. The Docker image will become visible in the docket desktop window, as shown in the below image.
Step 3: Launch the SQL Server Image in Docker
Run the following command in the terminal again to launch the image that was downloaded in Docker:
docker run -d --name sql_server_test -e 'ACCEPT_EULA=Y' -e 'SA_PASSWORD=dockerStrongPwd123' -p 1433:1433 mcr.microsoft.com/mssql/server:2022-latest
-d: Launches the docker container in daemon mode, allowing it to run in the background without a terminal window open.--name: Sets a name for the Docker container. In this example, we are using sql_server_test.-e 'ACCEPT_EULA=Y': Confirms by agreeing with end user license agreement (EULA) for Docker.-e 'SA_PASSWORD=dockerStrongPwd123': Sets the database password. In this example, we are using "dockerStrongPwd123'' as the password. In general, I recommend using a strong password-p 1433:1433: Maps the container to the local port 1433. Default TCP port that SQL Server uses to listen for connections.mcr.microsoft.com/mssql/server:2022-latest: Selects an image file for Docker to use.
Once the above command runs successfully, go to Docker desktop and select the container option. Then look for the container “sql_server_test” as we mentioned in the above command.
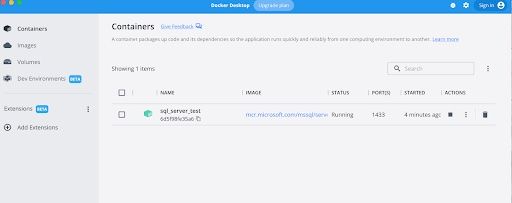
From the above we can see the container “sql_server_test” is running.
Step 4: Install the MS SQL CLI
We need to install sql-cli via npm. Before proceeding, npm should be installed on the Mac. If not, download npm now.
Run the below command on your terminal.
$ npm install -g sql-cli
If you get permission error, use the command below:
$ sudo npm install -g sql-cli
Step 5: Test the Installation
Once you’ve installed the sql-cli, test it by logging in using the command below:
$ mssql -u sa -p
After giving my password, here is the command:
$ mssql -u sa - p dockerStrongPwd123
Then run select @@version to verify the connectivity in the terminal.

If you get the above message, congratulations — the SQL server is up and running on your Mac. You can now go ahead and run SQL queries against the SQL server.
Step 6: Download and install the GUI application - Azure Data Studio
We need to install a graphical user interface (GUI). For that, we’ll download Azure Data Studio. Azure Data Studio is available on Mac as well as on Windows because SSMS won’t work on Mac.
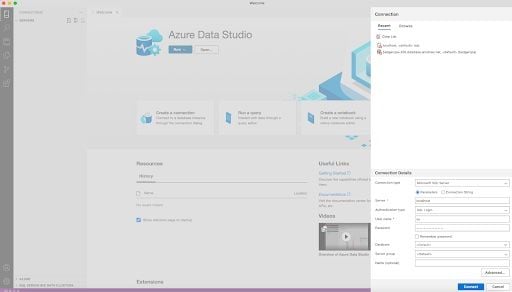
From the above link you will be able to download the zip file. Unzip and open the Azure Data Studio. Once you’ve done so, select a new connection and give it the below credentials.
Server - > localhost

Username -> sa

Password - > dockerStrongPwd123
Then click connect. We have to enter the username and password that we used in step five.
As soon as you get the connectivity via the Azure Data Studio, you can run your SQL queries and get your work done.
Step 7: Closing and Restarting
Once you complete your work, you can save your progress and quit the workspace. Enter the mssql prompt [press ctrl+c] and stop the running Docker container using the docker stop command. If you want to re-open it, restart the existing docker container and start the SQL server via the terminal giving your username and password.
$ mssql -u sa -p dockerStrongPwd123
Then open Azure Data Studio once again and continue your work.
Frequently Asked Questions
What is the SQL Server Management Studio?
SQL Server Management Studio (SSMS) is an integrated development environment tool by Microsoft for querying, designing and managing SQL infrastructures. It can be used to configure components of database systems and services like SQL Server, Azure SQL Database and Azure SQL Managed Instance.
Where is SQL Server management?
SQL Server management can be done through SQL Server Management Studio (SSMS). SMSS can be accessed on Windows by typing ‘SSMS’ on the Start page and selecting ‘Microsoft SQL Server Management Studio.’ SSMS can also be downloaded directly from Microsoft.
Is SQL Server management free?
SQL Server Management Studio is free and available by default for Windows operating systems.
What is the difference between SQL Server and SSMS?
SQL Server is a relational database management system used to store and retrieve data. SSMS is an integrated environment that can be used to access and manage components for SQL Server databases and other Microsoft SQL database services.