Have you ever wanted to learn how tools like Terraform and Ansible complement each other? Perhaps you’d like to see an example of how to automate the Microsoft Azure infrastructure to prepare a complete web app deployment. Or maybe, you just need to know how to deploy a web application using Visual Studio to an Azure virtual machine (VM).
If any of the above topics interest you, you’re in luck. In this project, you’re going to learn how to build (from the ground up) a complete Azure infrastructure with a deployed web application.
A Glance At What You'll Be Using
- Azure: Microsoft’s cloud computing service.
- Terraform: An open-source infrastructure-as-code tool.
- Ansible: An IT automation platform.
What You’ll Get From This Project
If you’re wondering why you should invest your time building this project, here is a summary of what you’re going to have once you’re done:
- An Azure resource group.
- Two Azure Windows Server VMs in an availability set running IIS.
- A load balancer with a health probe, rule, frontend configuration and backend pool.
- A network security group (NSG) with applicable rules defined.
- All the networking you need to link all resources together (Azure vNet and subnet).
- An example ASP.NET web application available behind a load balancer.
All of the above will be done with Terraform automatically building the infrastructure and handing off to Ansible to configure and prepare the VMs for a web app deployment.
Finally, once the infrastructure is built and configured, you’ll use Visual Studio 2019 to deploy an example web application to your VMs.
Note that you will incur some Azure resource usage in this tutorial. If you pay for your Azure resource usage, you will be charged a nominal amount to build this project in your Azure subscription.
Prerequisites
This project is a hands-on demonstration meant for you to follow along step by step, so please be sure you have the following before starting:
- An Azure subscription.
- Azure Cloud Shell already set up. You will be performing all configuration tasks in Azure Cloud Shell. Be sure you’re logged in and have created a storage account.
- Visual Studio 2019, Community edition, which you can download here. Be sure to install the .NET Desktop development and Azure development workloads.
Building the Infrastructure With Terraform
To run a web application in Azure, you must need the infrastructure to run it on. We’ll be using Terraform, an infrastructure-as-code tool that allows you to define thousands of different infrastructure components in a plan which you can then deploy.
The Terraform Plan
You can find a GitHub Gist with the Terraform plan you need to invoke here, with comments in the code to help you understand what it will be building.
This plan uses variables. In this variables.tf file is where each of the variables are defined.
Next, in this terraform.tfvars file, you have default values set for each variable. When you download this file in the next step, you can change these values or you’ll learn how to overwrite them when invoking the plan.
Downloading the Terraform Plan
To ensure you can start this project with minimal prerequisites, you’ll be using the Azure Cloud Shell. The Azure Cloud Shell is a console in the cloud with many tools built right in, like Terraform and Ansible.
The first step is getting the Terraform plan into your Azure Cloud Shell instance. To do that:
1. Open up your Azure Cloud Shell.
2. Input the following PowerShell code snippet into the Shell:

This snippet will:
- Create a folder called terraform in your home directory.
- Download the main.tf Terraform configuration file.
- Download the terraform.tfvars (the variables file containing values).
- Download the variables.tf representing the variables the main.tf configuration file will use.
It’s now time to build the infrastructure with Terraform.
Building the Infrastructure With Terraform
Once you have the requisite Terraform files available in Azure Cloud Shell, it’s time to run the Terraform configuration. While still in Azure Cloud Shell:
1. Initialize and confirm the Terraform plan is valid using terraform init and terraform plan. This step will download all of the required providers and perform a test of the plan to ensure all is well. If you receive no errors, you’re ready to build the infrastructure.
2. Find the public IP address your Azure Cloud Shell session is coming from by running the following code snippet: curl https://ifconfig.me. You’ll need this to pass to the Terraform configuration.
3. Find your local public IP address. Terraform needs to open up a port in the network security group to eventually deploy the web app with Visual Studio a little later. You can easily find this IP address by opening up PowerShell on your local computer and running the following with PowerShell: curl https://ifconfig.me. Ensure you run this on your local machine and not Azure Cloud Shell.
Run the Terraform plan to build all of the infrastructure using terraform apply and using the syntax below. This process may take a few minutes.

Be sure you fill in the appropriate variable values with the -var parameters:
- location: The location where the Azure resource group is in. This variable defaults to eastus.
- resource_group: The name of the resource group to deploy resources into. This variable defaults to NoBSDevOpsMonolith.
- cloud_shell_source: The IP address of the Azure Cloud Shell instance gathered from above.
- domain_name_prefix: The DNS prefix that will be applied to each VM. This variable must be unique.
- management_ip: The public, local IP address of your workstation.
- auto-approve: Removes the usual prompt to ask if you’d really like to do this or not.
When Terraform is complete, you should have a resource group created with everything you need inside and ready for Ansible to take over.
Keep in mind that Terraform will return the public IP address of the load balancer, which will set in front of the web servers. It will also return both of the public IPs for the VMs. Be sure to note these as you’ll need them a little bit later. If it doesn’t return the IP addresses on the first run, run the apply command again.
Installing and Configuring IIS With Ansible
Next, it’s time to use Ansible to install and configure IIS on the Windows VMs. You’ll be using the following Ansible playbook.
This playbook prepares the VMs to receive the application via Web Deploy. The playbook:
- Installs the base set of IIS Windows features.
- Installs the Web Management Windows feature.
- Set the registry value to enable remote management of the IIS Web Management Service.
- Downloads and installs the Web Deploy software package.
- Starts and sets the Web Management Service to automatic.
You can view and download this playbook at this GitHub gist.
To invoke the Ansible playbook:
1. Open up the Azure Cloud Shell if you don’t already have it open.
2. Create a new directory to hosts (mkdir ansibleConfigs) the Ansible configurations and go to it. If you’re still in the terraform directory, be sure to back out of it with cd ansibleConfigs.
3. Download the Ansible hosts file and the iis.yml playbook by running the below PowerShell code snippet:

4. Next, change the Ansible hosts inventory to point to the VMs you just created. To do that, run code. This will open up VS Code.
5. Once in VS Code and click on the hosts file in the left pane. The hosts file is Ansible’s inventory with the names of the VMs it will be running our playbook on.
6. Under the [azurevms] section, you will see two IP addresses. These IP addresses are the public IPs of your VMs. Change these IPs to match the IPs output with Terraform earlier. Below is a screenshot showing two public IPs.

7. Hit Cmd or Ctrl-S to save the hosts file and Ctrl-Q to quit.
It’s now time to see what Ansible can do. To install IIS on both of your Windows VMs, run the following Ansible command specifying:
- The name of the playbook: (iis.yml)
- The hosts file that contains the target hosts you just updated: (-i hosts) ansible-playbook iis.yml -i hosts
If all goes well, Ansible should connect to each of your Windows VMs and install IIS.

You now have all of the infrastructure built and configured ready for a web app.
Deploying the Application
At this point, you should have the infrastructure built and configured to support deploying the application. Now it’s time to build the web application and get it deployed onto your VMs.
1. First, come back to your local computer and clone a sample app at *movieapp-dotnet-core* GitHub repo using whatever method you prefer. This is the command to use the Git command-line: git clone https://github.com/NoBSDevOps/movieapp-dotnet-core.git
2. Open up Visual Studio.
3. Open a new project or solution under Get started and choose Open a project or solution.
4. Navigate to the MovieApp application where you cloned it to and choose the RazorPagesMovie.csproj file. A .csproj file in .NET specifies a C# project file that contains a list of files included in the project to make the application work, along with references to system assemblies.

5. Visual Studio will open the project as shown below.

6. Right-click the solution in the far right (RazorPagesMovie) and click Publish. This invokes a series of steps that will guide you through compiling and publishing the application onto a target.
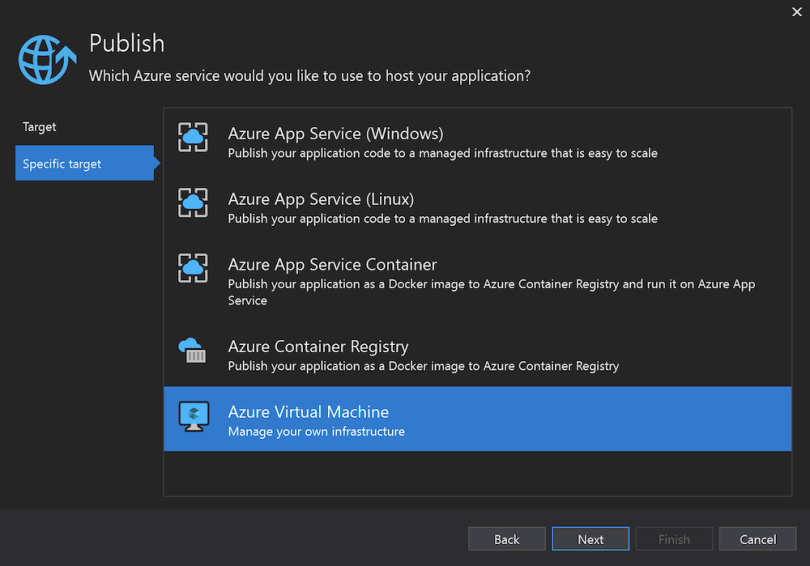
7. Chose Azure on the Publish screen. There are many ways to deploy an application to an IIS server, but you can save some time by using the built-in WebDeploy functionality with Visual Studio.

8. Since the web app is hosted in IIS on an Azure VM, choose Azure Virtual Machine. You will be presented with a list of VMs to deploy to:
9. Browse to the resource group you deployed the application. You should see both of the Azure VMs in the resource group.

10. Choose the first VM. You should see a progress circle below the window indicating it’s testing the connection. If all goes well, you should see no error messages. If so, click on Finish to add the VM.
11. You must now provide credentials to connect to the VM and also accept the self-signed certificate on it. To do that, click on Edit as shown below.

12. Provide the Password and click on Save Password so you don’t have to provide it every time you perform a deployment. When complete, click on Validate Connection. The main reason you’re validating the connection is to permanently install the self-signed certificate on the VM. If not, you won’t be able to connect.
13. When you click on the Validate Connection button, you will receive an error about not trusting a certificate. This event is expected. Check the Save this certificate for future sessions of Visual Studio checkbox and click on Accept.

14. Now repeat steps 6-12 for the second VM. When complete, you should have two VMs shown in the Publish dropdown.

15. Choose each VM and click on the Publish button. This action will tell Visual Studio to use WebDeploy to transfer all files from the local Git repo to the IIS site on each VM.
Validate Your Hard Work
At this point, you should have the entire Azure infrastructure built and the web app deployed. Now see if things actually worked.
1. Find the IP address or DNS name of the load balancer you built earlier. If you still have Azure Cloud Shell open, you can scroll up to find it from the Terraform output. If not, you can go to the Azure portal and look for the load balancer’s public IP address.
2. Open up a browser and insert the load balancer’s IP address and you should see the sample MovieApp page come up.
If you’d rather not leave all of these Azure resources running, log back into Azure Cloud Shell and remove all of the created resources with Terraform using cd terraform and terraform destroy -auto-approve.
Congratulations! You’ve completed building the entire infrastructure needed for a web application running on IIS in Azure.