Authentication is the process of proving who we are in order to gain access to something that’s been locked or restricted. For example, to access our email, we need to provide a username and password; to enter our homes, we need to provide a key; to unlock our smartphones, we need to provide our fingerprints or face scan.
These three examples represent the three kinds of authentication:
- Something you know: a username and password.
- Something you have: a house key, a passport, a cell phone, etc.
- Something you are: your fingerprints, face scan, voice match, etc.
In the world of technology, each kind of authentication is known as a “factor.” Therefore, when you log in to check your email, you’re met with a “single-factor” authentication request because it only challenges you to provide something that you know: a username/password combination.
Single-factor authentication protection is very weak. Obviously, if anyone else happens to know — or manages to steal! — your username/password combo, then they have access to your emails. Not good.
The Power of Multifactor Authentication
Employing two or more factors of authentication is known as “multifactor” authentication or MFA. Having MFA in place means that access isn’t granted without two (or more) different kinds of authentication. For example, after upgrading my email account to use two different factors of authentication, gaining access now requires:
- Knowing my username and password combo.
- Having an app on my cell phone provide me with a six-digit security code (which changes every 30 seconds) to enter on a second challenge.
Without providing both of those authentications, access to my email is locked. And here is where the power of MFA starts to shine. While it’s relatively easy to steal someone’s username/password, it’s extremely difficult to gain access to another device on my person, like a smartphone. How difficult? When Google deployed a form of MFA called security keys to 85,000 of its own employees, it stopped 100 percent of all account takeovers. You read that correctly: 100 percent.
That’s precisely why I’ve set up similar MFA protection for all of my online accounts. Although having to provide extra data in order to log into those accounts adds extra time and inconvenience, knowing that my accounts are truly safeguarded is absolutely worth it.
By default, access to our most critical accounts only requires a single factor of authentication. That makes gaining unauthorized access to our email, social media, online shopping accounts, Apple ID, file-sharing services and much more unacceptably easy.
One famous example of just how easy it is comes from Mat Honan, a technology reporter and editor. In 2012, Honan’s Amazon, Gmail, AppleID and Twitter accounts all got hacked. His Apple devices were all remotely wiped, and he lost crucial data, including irreplaceable photos and videos of his newborn child. Worse, since Honan didn’t maintain regular back-ups, his data was lost forever.
What happened to Mat was tragic but 100 percent preventable.
Setting It All Up
Although there are a variety of ways to set up and use MFA, the easiest way is to download and use the free Authy app, available for both iOS and Android. Authy is not only easy to use, but its website is also a treasure trove, full of up-to-date guides for how to add MFA to each of your most precious accounts.
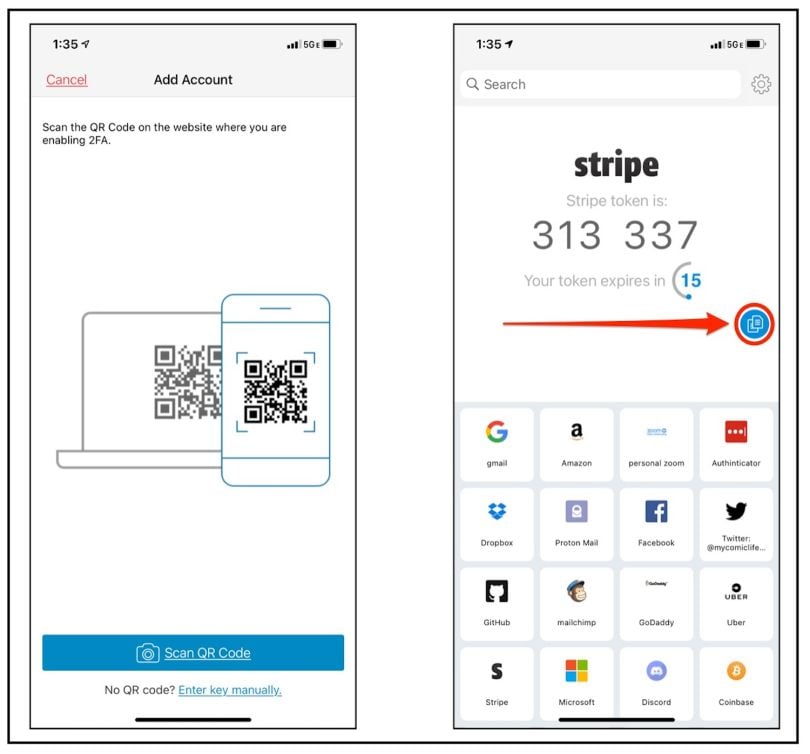
When you first open Authy, you’ll be met with a pleasing interface and some short initial set-up. You’ll also notice a giant + button once your account is set up. Clicking that button kicks off the process for Authy to add MFA to each of your accounts. It starts by scanning a square code known as a “QR” code with the app, shown at left, below:

Once scanned, you’ll add your account into Authy’s easy-to-navigate and icon-based library. If you’re adding Facebook, for example, Authy knows to use the FB logo so your second factor of authentication is easy to find, as shown above right. Same with most accounts you’ll add.
Then, the next time you log into one of the accounts you’ve secured, you’ll be asked for a six-digit challenge code. Open Authy, find the account in question, and enter the timed-based, one time password (or TOTP). These passwords last for only 30 seconds before changing, which is indicated by a countdown clock.
There’s even a handy copy button (indicated by the red arrow and circle in the image above), which allows you to easily copy/paste your six-digit code into other applications on your mobile device.
My strong recommendation is this: Add MFA to every account you use that allows for it. If that seems like a burden, then I urge you to at least start by adding MFA to any account — think email, social media or other important technology accounts — where a breach might harm your social life, finances or employment.
Here are the links to the Authy guides, which I used to lock down my Amazon, Facebook, Twitter, Gmail, Microsoft, Mailchimp, ProtonMail and Dropbox accounts, among others.
Notable Exceptions
Zoom: Oddly, Authy offers no guide for how to add MFA to your Zoom account. Since you should absolutely add MFA to your Zoom account, just use the directions on Zoom’s webpage, which shows you how.
Apple: Apple, because they like to “Think Different,” has engineered and uses an MFA process that consumers can’t use with Authy. While that’s an inconvenience, you should still, without question, set up Apple’s MFA for your AppleID accounts. Use Apple’s webpage to learn how to use their system.
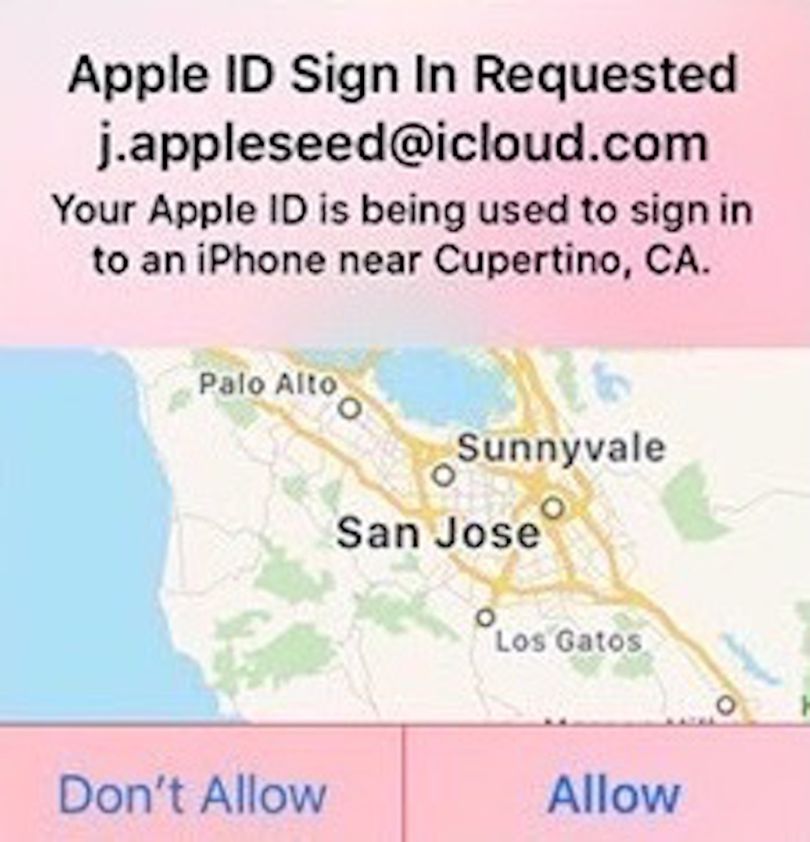
One nice benefit to Apple’s system that Authy doesn’t provide: a map, showing you the location where the log in to your account is being requested. If someone you don’t know tries to log into your AppleID account from, say, Cupertino, California, Apple shows you a map with that location:

That’s pretty convenient. And if you don’t live in Cupertino, California, then you should obviously not allow that request and make note of the time/date. Requests to log into your AppleID that you didn’t request indicates that someone has captured, stolen, or discovered your first factor of authentication: your username and passcode. Change your password immediately.
A Final Reference
If you’re not sure whether any of your online accounts offer MFA, there’s one place to check: https://twofactorauth.org/. Not only can you search by category, but every listing for a company that does offer MFA points to the webpage that explains how to set it up.


