Mutual transport layer security (mTLS) or two-way secure socket layer is a method for mutual authentication. Mutual TLS ensures that both parties sharing information are who they claim to be by verifying that they both have the correct private key. To better understand how mutual TLS works, we first need to understand what TLS is and how it works.
Mutual TLS Defined
Mutual transport layer security (mTLS) is an end-to-end security method for mutual authentication that ensures both parties sharing information are who they claim to be before data is shared. It requires an additional step in which the server also asks for the client’s certificate and verifies it at their end.
What Is TLS?
Transport layer security (TLS) is a cryptographic protocol that provides end-to-end security of data sent between applications over the Internet. TLS evolved from secure socket layers (SSL), which Netscape Communications Corporation developed in 1994 to secure web sessions.
TLS is normally implemented on top of transmission control protocol (TCP) to encrypt application layer protocols such as HTTP, file transfer protocol (FTP), simple mail transfer protocol (SMTP) and internet message application protocol (IMAP), although it can also be implemented on user datagram protocol (UDP), datagram congestion control protocol (DCCP) and stream control transmission protocol (SCTP), as well.

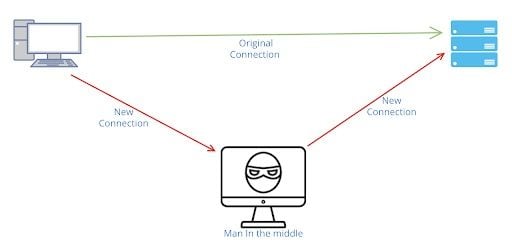
It verifies the identity of the server with asymmetric cryptography. So that client can verify it’s connecting to the intended server only and can prevent man-in-the-middle attacks.
It encrypts the connection between the client and server using symmetric key cryptography to protect the data exchange between the two. This makes sure that anyone who intercepts the message will not be able to read it since it’s encrypted and they don’t have the key to decrypt it.
It also identifies the data alteration during the transmission using a message authentication code (MAC). This ensures that the message received is intact and no one in the middle has altered the content of the message. The middle-man can’t read it because it’s encrypted; however, they can alter the message using bit flipping.
What Is Mutual TLS?
In TLS, the client verifies the server’s identity by asking for and validating its certificate. In mutual TLS, there is an additional step involved in which the server also asks for and verifies the client’s certificate. A secure connection for data transfer is only established when both client and server successfully authenticate themselves and verify each other’s certificates. This is also known as two-way SSL.
How Does Mutual TLS Work?
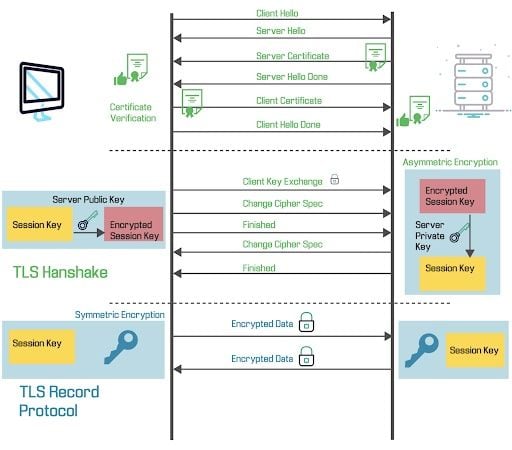
Mutual TLS is very similar to the TLS protocol. In mTLS, there’s an additional step involved before the key exchange. The client sends its public key and certificate to the server, which the server verifies to identify the request is coming from a known client and has the private key corresponding to the public key that the client shared.
There are nine steps to a mTLS handshake. Here’s what they involve:

Step 1: Client Initiates the Handshake
The client initiates the handshake with the ‘Client Hello.’ It consists of several pieces of information, including:
- Version: Hex code of the highest version of TLS/SSL that the client supports.
- Session ID: An 8-byte value, initially all 0s, is used to label the sessions.
- Cipher Suites: A list of cipher suites (algorithms) client supports, which is nothing but a set of cryptographic algorithms, like RSA, Diffie-Hellman, etc.
Step 2: Server Responds
Once received, the server responds with ‘Server Hello,’ which consists of the same five pieces of information for the server, this time with a session ID.
Step 3: Server Sends Its Certificate
Next, the server sends its certificate along with its certificate chain and its public key.
Step 4: Client Verification
Now the client needs to verify two things in the certificate:
- Is the certificate valid? This is done by verifying the signature on the certificate using CA’s public key (that it was indeed signed by CA using his private key).
- Does it belong to the intended server?
Step 5: Server Verifies the Certificate
To verify whether the certificate belongs to the intended server, the client creates a random secret key, encrypts it using the server’s public key and sends it to the server.
Step 6: Server Decrypts the Random Secret Key
Now the server decrypts the random secret key using its private key.
Step 7: Client Sends Certificate
Next, the client sends its certificate along with its certificate chain and its public key.
Step 8: Client Verifies the Certificate
Now the client needs to verify two things in the certificate:
- Is the certificate valid? This is done by verifying the signature on the certificate using CA’s public key — that it was indeed signed by CA using its private key — or the server maintains a keystore. The implementation differs from server to server.
- Does it belong to the intended client?
Step 9: Verify That the Certificate Belongs to the Client
To verify whether the certificate belongs to the client, the server creates a random secret key and encrypts it using the client’s public key and sends it to the client.
Applications of Mutual TLS
Mutual TLS is often used in zero trust security environments to verify users, devices, and servers within an organization network. It can also help keep APIs secure. You’ll want to consider mTLS in situations that include:
- In B2B API interactions where the server doesn’t want to expose its services to the entire world and wants to make sure the request is coming from a known client.
- In B2B financial transactions. For example, transactions between two bank servers.
- For authenticating and encrypting service-to-service communication between microservices or with the API gateway.
- Device authentication. For example, a payment gateway wants to make sure that the request is coming from a registered device (POS terminal).
Advantages of Mutual TLS
There are a couple of advantages of mTLS over TLS.
- It validates not just the server’s certificate but also the client’s certificate, making it more secure than TLS.
- It reduces the reliance on passwords for security. Passwords are relatively insecure and susceptible to brute-force attacks.
Disadvantages of Mutual TLS
If mTLS is more secure than TLS, then the obvious question is why isn’t it more popular? And why haven’t we replaced TLS with mTLS across the entire internet? That’s because there are a few disadvantages to mTLS:
- It’s more complex to implement. The number of clients and servers can be massive, and it’s difficult and costly for the server to maintain certificates for all the clients and validate and verify each client for each session. Managing and verifying certificates at this scale is not practical.
- Mutual TLS is computationally costly and slower than TLS. There are more steps or round trips involved in an M-TLS handshake. It’s an order of magnitude slower than TLS, and hence it’s not useful for scenarios where lower latency is a bigger priority than zero trust security.
- It can only be implemented in an environment where you have control over the clients,and you can dictate what type of security each client must have to connect to the server.
How to Set Up Mutual TLS
If you’d like to implement your own mutual TLS configuration in JavaScript, here’s what you need to do. First, let’s create a node server with Mutual TLS configured. This should include the following features:
- The server has its own public/private key pair to share with clients: refer
server.key/server.crt. - The server manages a verified client certificate store, refer
options.ca array). For all handshake requests, it verifies the client’s certificate against this store to identify this is a known client. - The option
requestCert: trueenables mutual TLS for this node server. This server will request the client to present its certificate for the handshake, and upon failing, it will reject the request. - If it’s able to verify the certificate it will return the 200 OK response.
Server.js
const https = require('node:https');
const fs = require('fs');
const { Http2ServerRequest } = require('node:http2');


const options = {
 key: fs.readFileSync('./server.key'),
 cert: fs.readFileSync('./server.crt'),
 ca: [
   fs.readFileSync('./client.crt'),
 ],
 requestCert: true,
 passphrase: 'hello'
};


https.createServer(options, (req, res) => {
 res.writeHead(200, {});
 res.end('Hello World');
}).listen(3000, () => {
 console.log('Server is running on port 3000');
});
Next you’ll create a Node.js client with mutual TLS configured:
- The client has its own public/private key pair to share with the server. Refer
client.key/client.crt. - The client also manages a verified certificate store (refer options.ca array) because we used self-signed certificates for this demo.
- The client makes an HTTP request to the server over mutual TLS and prints the response it receives from the server.
Client.js
const https = require('node:https');
const fs = require('fs');
const { Http2ServerRequest } = require('node:http2');


const options = {
 hostname: 'localhost',
 port: 3000,
 path: '/',
 ca: [
   fs.readFileSync('./server.crt'),
 ],
 rejectUnauthorized: false,
 key: fs.readFileSync('./client.key'),
 cert: fs.readFileSync('./client.crt'),
 passphrase: 'world'
};


const req = https.request(options, (res) => {
 console.log('Status Code : ', res.statusCode);
 console.log('Headers : ', res.headers)


 res.on('data', (data)=> {
   process.stdout.write(data);
 })
})


req.on('error', (err) => {
 console.log(err);
})
req.end();
Finally, below are some common commands to generate keys and certificates:
- $openssl genpkey -out server.key -algorithm RSA -pkeyopt rsa_keygen_bits:2048 -aes-128-cbc
- $openssl req -new -key server.key -out server.csr
- $openssl x509 -req -days 365 -in server.csr -signkey server.key -out server.crt
And that’s all you need to start building your own mutual TLS.
Frequently Asked Questions
What is mutual transport layer security (mTLS)?
Mutual transport layer security (mTLS) is an end-to-end security technique that verifies the identities of two parties involved in a data transaction. It achieves this by ensuring both the server and the client have the correct private key.
What is the difference between TLS and mTLS?
Mutual TLS confirms that the server and the client possess the correct private key to verify both parties’ identities. On the other hand, traditional TLS only verifies whether the server has the right key.
What are the main use cases for mTLS?
Common applications of mTLS include securing B2B financial transactions, encrypting microservice communications and authenticating devices.


