

Experience in processing images programmatically is a useful skill in nearly every professional field. This guide will provide a high-level overview of programmatically modifying images, and OpenCV is an excellent option.
What is Image Processing?
Image processing is the practice of programmatically altering .jpg, .jpeg, .png, .tiff, .webp, .gif or any other type of image file.
Python is a widely used programming language for two major reasons.
The first is the simplicity of the syntax. In terms of how many characters you type relative to the utility of your program, Python is far more efficient than many other languages. Tasks that would require hundreds or thousands of lines of C or C++ can be accomplished with three or four lines of Python. That doesn’t mean three or four lines that extend for 45 feet to the left of the edge of the screen; it means three or four lines that fit on one standard-size piece of paper.
The second is that Python has an immense variety of libraries that can extend the core functionality of base Python. Many of these libraries can easily be accessed via the Python Packaging Index (PyPI). PyPi has hundreds of thousands of libraries, reflecting the extensive ecosystem available to Python developers. All of which can be downloaded by opening your favorite command line interface and simply typing:
pip3 install example-library-name
What Is OpenCV?
Open Source Computer Vision (OpenCV) is a computer vision and machine learning library. Originally released by Intel in 1999, the project has since been taken over by an active community of developers from around the world. OpenCV is written in C++ with bindings for Python and Java.
Upload this photo as starryNight.jpg. (Note: Save it using that exact name in order for this code to work).
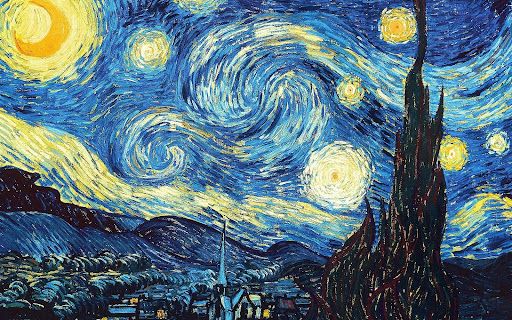
In this example, we will demonstrate how to use OpenCV to process Vincent van Gogh’s 1889 masterpiece: The Starry Night (starryNight.jpg). One of the most famous paintings in the world, The Starry Night depicts the view from van Gogh’s living quarters in a French mental asylum. In our tutorial we will use the OpenCV library to process this image file, starryNight.jpg, in three different ways.
Before we get into all of that, you will need to execute three steps to prepare your development environment for processing starryNight.jpg.
Step 1: Installation
First things first: Install the OpenCV library (also known as “cv2”). As we discussed previously, the Python packaging index can be used to easily accomplish this task.
bash
pip3 install opencv-python
Step 2: Import the OpenCV Library
After installing OpenCV, the next step is to import it into either a Python script or a command line instance of the Python interpreter.
Python3
import cv2
Step 3: Read the Image with OpenCV
OpenCV uses the cv2.imread method to convert the image file into a Python object.
Python3
starryNightImage = cv2.imread(“starryNight.jpg”)
The aforementioned variable contains a bitmap of the starryNight image file. You can display this original unedited image by using:
Python3
cv2.imshow(‘Original Image’, starryNightImage)
Grayscale
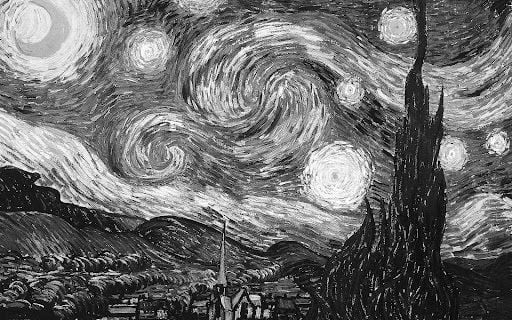
First, we convert the image to grayscale. This term requires less explanation. As you may have guessed, grayscale images convert colors to shades of gray.
If you’re running these commands one by one from the command line and closed the interpreter after creating a Gaussian blur, complete steps one through three again, then use the cvtColor method and cv2.COLOR_BGR2GRAY parameter to convert the image to grayscale, before finally using the cv2.imwrite() method to save the image as starryNight_gray.jpg:
Python3
gray_image = cv2.cvtColor(starryNightImage, cv2.COLOR_BGR2GRAY)
cv2.imwrite('starryNight_gray.jpg', gray_image)
Gaussian Blur
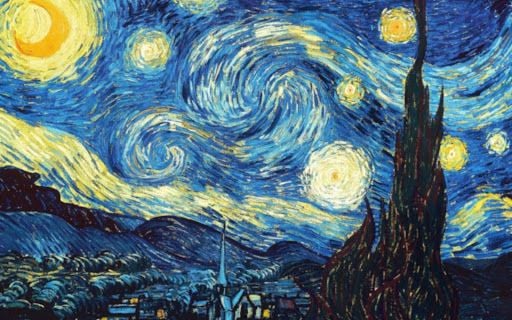
Next, we will apply a Gaussian blur. Gaussian blur is a common technique in image processing that is often carried out by the post-processing firmware on your digital camera, whether it’s a dedicated digital camera or a smartphone.
Applying a Gaussian blur of variable strength allows the image to maintain appearance and structure indicative of the raw image file but with a reduction in the level of detail.
Picking up where the previous example left off:
Python3
gaussian_image = cv2.GaussianBlur(starryNightImage, (15, 15), 0)
cv2.imwrite('starryNight_gaussian.jpg', gaussian_image)
Canny Edge Detection
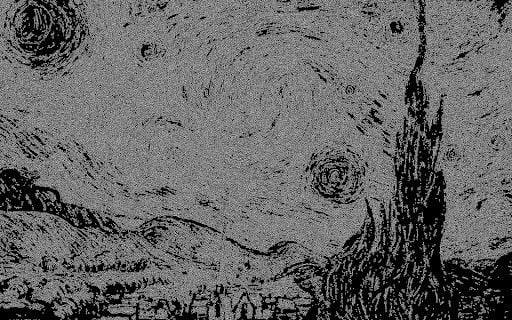
Finally, we will detect the edges using the Canny edge detection method. The Canny edge detection method is a popular image processing technique widely used in computer vision applications. It is named after its inventor, John Canny, and is considered to be one of the most accurate edge detection methods available.
The Canny edge detection method works by identifying the edges in an image based on the gradients of the image pixels. It involves a series of steps, including smoothing the image with a Gaussian filter, calculating the gradient magnitude and direction of each pixel, applying non-maximum suppression to thin out the edges, and finally applying hysteresis thresholding to determine the final set of edges.
The OpenCV library accomplishes these tasks with the cv2.Canny() method.
Python3
edges_image = cv2.Canny(starryNightImage, 100, 200)
cv2.imwrite('starryNight_edges.jpg', edges_image)
Building From Scratch vs. Using an Existing Library
At times, Python developers have to choose between building a component from scratch or simply using an existing library to address a problem. There are costs and benefits associated with each approach.
When a developer builds something from scratch, it will almost certainly take longer than implementing an existing library and it also opens up the possibility of the developer making mistakes. However, the developer will gain a deeper understanding of how the overall program truly works and fine-tuning/modifying the underlying mechanisms should be much easier.
Using an existing library should allow for the project to be completed much faster. Using an external library will enable less-experienced developers to accomplish tasks well beyond their independent skill level.
In summary, OpenCV simplifies the process of working with images and offers extensive functionality, making it an ideal choice for both beginners and experienced developers.
Note: The code from this post is also available on Github.
Frequently Asked Questions
What is image processing in Python?
Image processing in Python involves programmatically modifying image files (e.g., JPG, PNG, TIFF) using libraries like OpenCV to perform tasks such as color conversion, blurring and edge detection.
Why is Python a good choice for image processing?
Python is favored for its simple syntax and large ecosystem of libraries. Tools like OpenCV allow developers to write powerful image processing code with minimal lines.
What is OpenCV and how is it used in Python?
OpenCV (Open Source Computer Vision Library) is a C++-based library with Python bindings used for computer vision and image processing tasks. In Python, it can be installed via pip and imported with import cv2.


